Archive
#ProjectServer 2013 environment migration / rollover steps #PowerShell #PS2013 #MSProject #SP2013
   I am a Project Server and SharePoint consultant but my main focus currently is around Project Server.
I have been working with Project Server for nearly five years since 2007 for a Microsoft Gold Certified Partner in the UK, I have also been awared with the Microsoft Community Contributor Award 2011. I am also a certified Prince2 Practitioner. This article has been cross posted from pwmather.wordpress.com (original article) |
This blog post will detail the PowerShell commands required to carry out an environment rollover / migration using Windows PowerShell where possible. The steps below use the 2 database approach to rollover over the Production environment to the Test / Development environment.
As a prerequisite I would recommend taking full backups of the Test / Dev farm to enable the environment to be rolled back if required. Use your usual farm backup procedures.
Test / Dev environment Prep
Firstly connect to the Test / Dev Application server and launch the SharePoint 2013 Management shell.
Type the following:
Dismount-SPProjectWebInstance -SiteCollection <URL of Test / Dev PWA site that you want to refresh with the Production data and config>
Example:

Press Enter and then type Y and press Enter to remove the PWA instance

You can check in Central admin in the Project Server Service Application to check that the PWA site has been removed:

Using the SharePoint 2013 Management Shell remove the existing content database from the web application that hosted the PWA site collection that was removed in the previous step.
Type the following:
Dismount-SPContentDatabase “<Database name here>”
Example:

Press Enter and type Y to confirm then press Enter

Test / Dev environment SQL Prep
Take a backup of the 2 databases from the Production environment and copy these over to the Test / Dev SQL server and restore the databases. The databases required are:
- Content database that contains the PWA site and Project Sites
- Project Web App database
Make a note of the database names used when these databases are restored as they will be required later.
Test / Dev environment configuration
Using the SharePoint Management Shell, attach the restored content database to the web application that will host the PWA site collection.
Type the following:
Mount-SPContentDatabase “<content database name restored in previous step>” -DatabaseServer “<Test / DEV SQL Server>” –WebApplication <web application URL>
Example:

Press Enter:

Using the SharePoint 2013 Management Shell mount the restored Project Web App database to the web application.
Type the following command:
Mount-SPProjectDatabase -Name “Name of the restored Project Web App database to mount” –WebApplication “Web Application ULR that the Project Web App database will mount to” –DatabaseServer “Test / Dev SQL Server where the database was restored”
Example:

Press Enter:

Now using the SharePoint 2013 Management Shell provision the PWA site collection in the web application where the database was just attached to and using the Project Web App database that was restored previously. Please note, use the same PWA path name used in Production. For example if the instance is called /PWA in Production, use /PWA in the command below on the Test / Dev environment.
Type the following command:
Mount-SPProjectWebInstance –DatabaseName “Name of the restored Project Web App database to mount” –SiteCollection “web application URL + PWA path” –DatabaseServer “Test / Dev SQL Server where the database was restored”
Example:

Press Enter:

You can check the provisioning status of the PWA site using PowerShell or in Central admin in the Project Server Service Application to check that the PWA site has been created:
Type the following:
Get-SPProjectWebInstance –URL <PWA URL> | Select ProvisioningStatus
Example:

Or in Central Admin:

Post Provisioning
The Project Sites will need to be relinked using the “Bulk Update Connected SharePoint Sites” functionality in Central Admin on the newly provisioned Test / Dev PWA site.
The Project Server Cube settings will need to be updated – update the SQL AS server / cube name.
Any Excel services reports will need to be updated to use the ODC files from the Test / Dev environment as they will currently point to the Production ODC files. This is done by opening the Excel reports in Excel, changing the ODC file then saving the file back to the library.

![]()

Update #SharePoint list item author and editor #SP2010 #PowerShell #PS2010 #SSRS
|
I am a Project Server and SharePoint consultant but my main focus currently is around Project Server.
I have been working with Project Server for nearly five years since 2007 for a Microsoft Gold Certified Partner in the UK, I have also been awared with the Microsoft Community Contributor Award 2011. I am also a certified Prince2 Practitioner. This article has been cross posted from pwmather.wordpress.com (original article) |
Recently while working on a client deployment we had an issue relinking the SSRS reports to the data sources within the same library – SSRS was in SharePoint integrated mode. We had developed the Project Server solution internally and migrated it to the clients environment at a later date. All worked as expected apart from trying to relink the SSRS Reports to the updated data sources. The SSRS data sources had been edited to use the correct databases / PSI web services but when we tried to link the reports to the databases from the Manage Data Sources menu, SharePoint threw an error when trying to browse to the data sources. The error from the ULS log can be seen below:
Microsoft.ReportingServices.Diagnostics.Utilities.SharePointException: , Microsoft.ReportingServices.Diagnostics.Utilities.SharePointException: Report Server has encountered a SharePoint error. —> System.NullReferenceException: Object reference not set to an instance of an object.
at Microsoft.ReportingServices.SharePoint.Objects.RSSPImpUser.get_LoginName()
at Microsoft.ReportingServices.SharePoint.Utilities.CatalogItemUtilities.GetListItemUserLoginName(RSSPListItem item, String fieldName)
The cause of this error was that the user who created the SSRS objects had been removed from SharePoint when the system was cleaned up to take on to the clients environment.
There is a simple fix, that is to update the Author (Created By) and Editor (Modified By) fields with a user that exists on the SharePoint farm. The Author field can’t be updated via the UI but it can be update via the object model.
I created a simple PowerShell script that will update the author and editor for all SharePoint list items in the chosen list. To download the PowerShell script please see the link below:
http://gallery.technet.microsoft.com/scriptcenter/Update-SharePoint-list-4e6272ab
There are some variables / settings that need to be updated before running the script, these can be found below:
$newuser = "support\paulmather" This needs to be updated with the new author and editor’s user account.
$site = get-SPWeb http://vm353/pwa/ProjectBICenter This needs to be updated with the correct URL for the site that contains the list / library.
$list = $site.Lists["Test"] This needs to be updated with the name of the correct library / lists that contains the list items that need to be updated, in this example the SSRS items.
That is it, the script is then ready to run.
Please fully test on a replica test farm before running on Production.

![]()

#ProjectServer 2013 PWA more integrated with Project Sites #PS2013 #SP2013
Since long i have been vocal about the distant connection between Project sites and PWA, formerly known as Project Work spaces in PS2007. Although project sites are meant to be a second home, other then PWA, to project team for their project activities.
However this distance some how comes in a way while convincing users to use project site associated with project to manage artifacts such as documents, issues and etc. One of the common request received in this case was, how to show projects tasks or project status on project site? and since there is no OOB way of achieving this in PS2010, then you have to come up with all these brilliant ideas of developing different custom solutions to accommodate such requests.
But it comes as a pleasant surprise in PS2013 that Project Sites are now more seamlessly connected with PWA. Though still the distant feeling exist, but was overcome to some extent to give user a more connected feel of Project site with their projects.
Your first experience: Project site link do not exist on ribbon anymore, its from with the Project now.
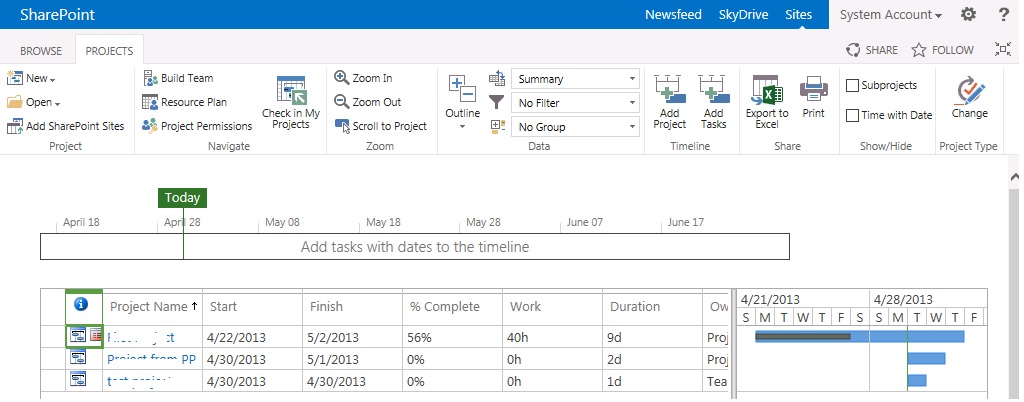
click on Project Name, and you will see the Project Site link along with PDPs.
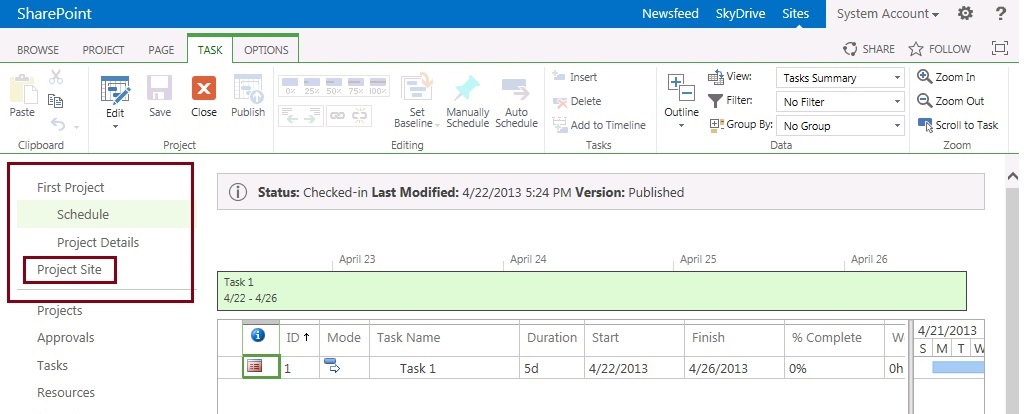
click on Project Site link, and it will NOT open in separate window as new site like old times: (unless you prefer, and use any of the trick to open in new window 🙂 )
(some whistles.. please 🙂 )
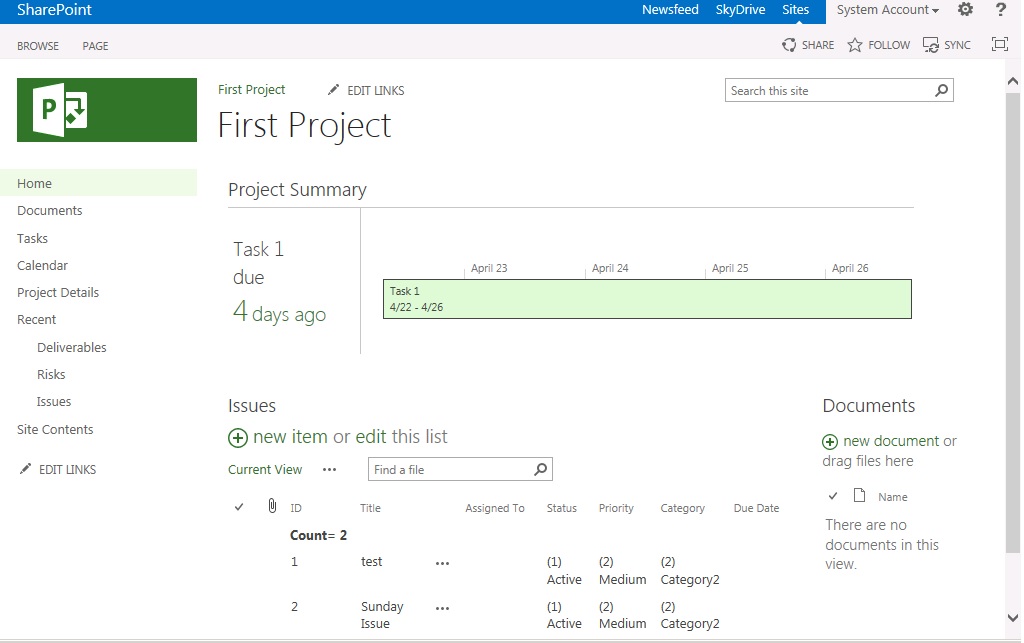
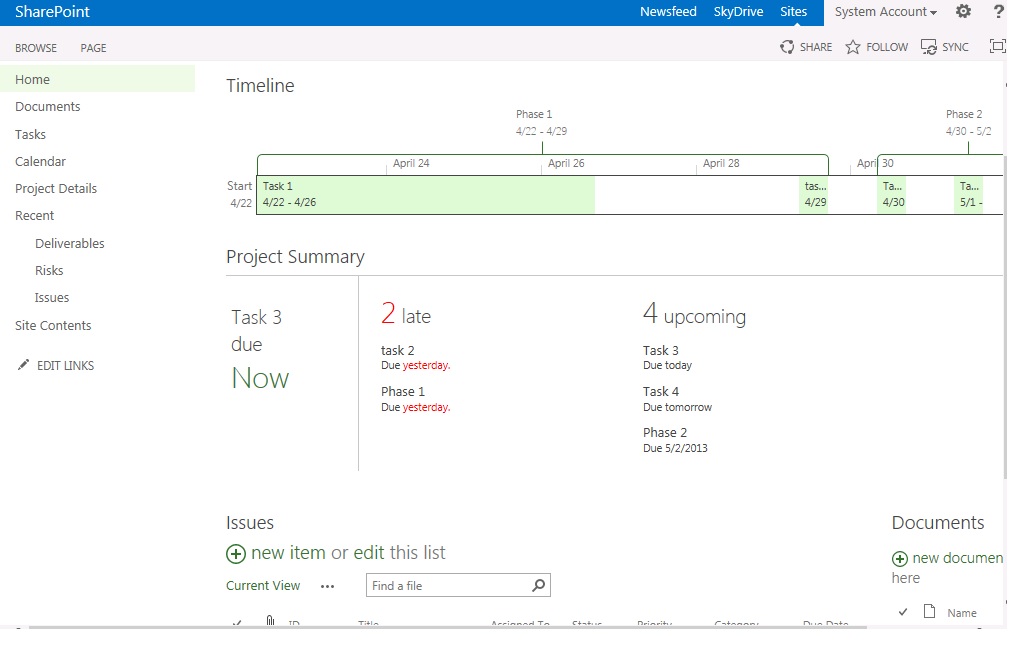
my first impression was WOW, the home page by-default shows the status including Project Timeline and Alert alert that you are behind schedule.
Deliverable/Issues and Risks lists are the same, in fact Paul Mather few days back wrote about the change of functionality of linking tasks along with issues/risks and documents here and took the opportunity away from me since i was also planning to write the same 🙂
(ok, ready for more good things …. :), here you go )
Tasks link until PS2010 was of no good in most cases, in fact i used to rename it as “Team Tasks OR Personal Tasks” for customers to avoid the confusion of mixing these tasks as project schedule tasks.
But now these alternates are not required any more. Lets click on Tasks link:
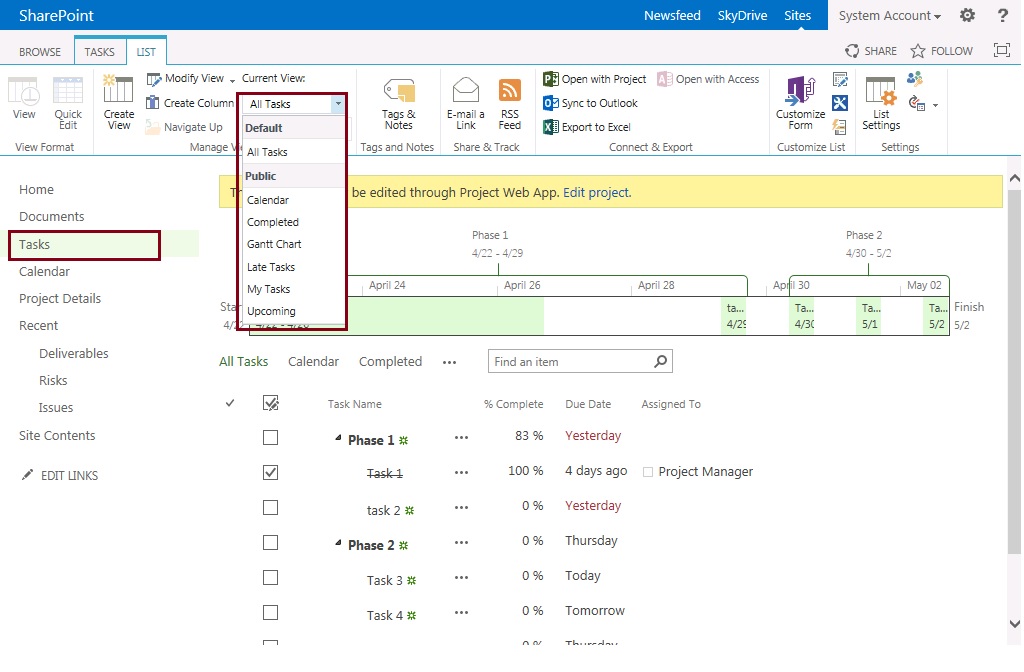
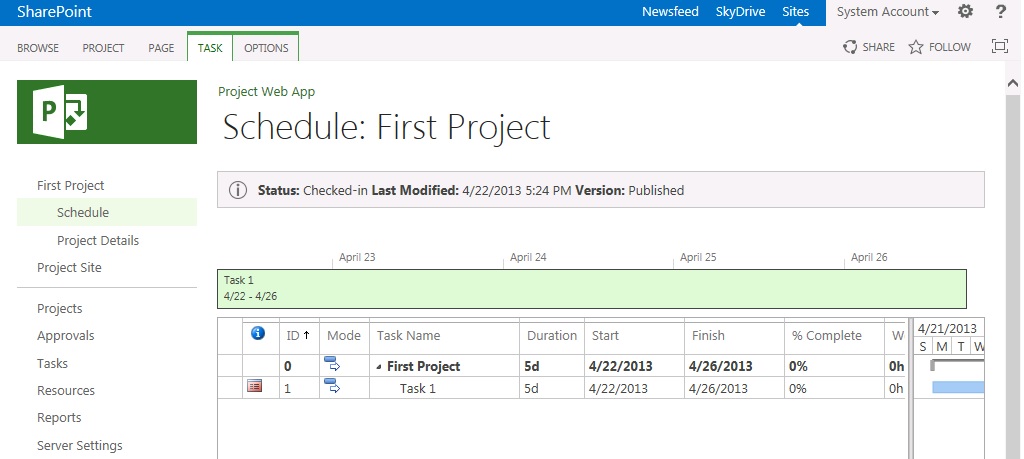
Your project tasks are displayed here to be shared with team, and of course you can change the view of tasks page to show you only Yours Tasks or etc. However you cannot edit the values of tasks here, such as %complete, it will take you back to project schedule for the editing which i believe is pretty logical.
Before we wind up, a quick hint to show that you can also add a famous Timeline web-part to your project site home page to show timeline alone. And also you can modify the existing Project Summary web-part to reflect information minus timeline.
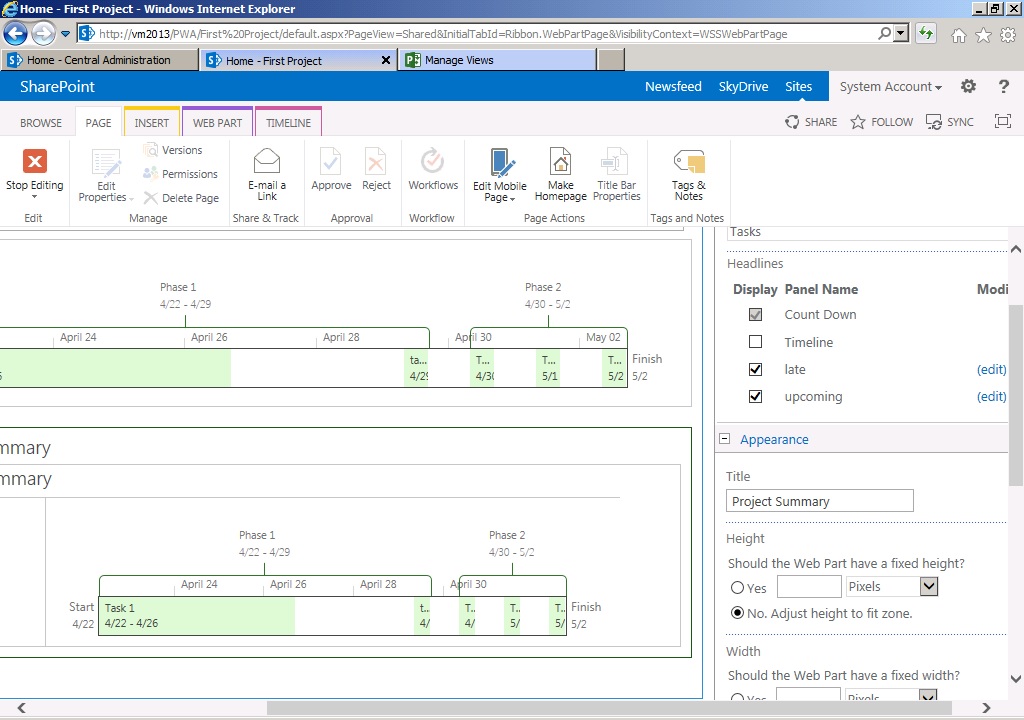
Here you go:
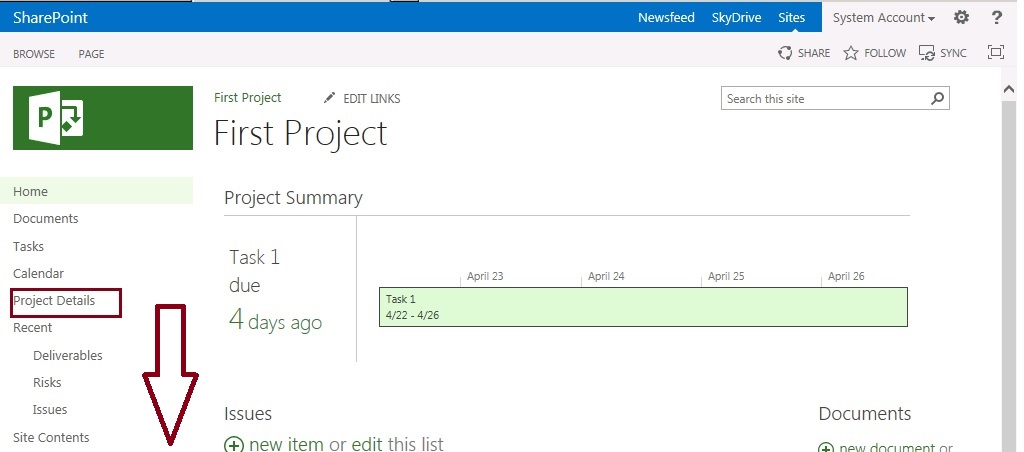
And now last but not the least, in order to go back to PWA, no need to look for navigation link on project site. Simply click on Project Details link to access project details:
 |
| Fig-1 |
This is it for now, we have seen enough good things – now lets get back to the real work issues 🙂
via All about Enterprise Project Management (EPM) http://khurramjamshed.blogspot.com/2013/05/projectserver-2013-pwa-more-integrated.html
 The author of the blog has an extensive experience of working as an EPM Consultant. Currently he is located in Dubai, UAE and working for Microsoft partner organization as Project Server specialist. He has a thorough experience of providing Project Management technical/functional consultancy to all sort of organizations. He is a certified PMP, a Project Server MCITP, and also received a MS community contributor award 2011.
This article has been cross posted from khurramjamshed.blogspot.com/ (original article) |

Dr Popup: Or How I learned to stop worrying and love the modal dialog
One of the many pieces of functionality added in SharePoint 2010 was the dialog window, this is a nice little control implemented in JavaScript that allows us to display a “lightbox” style dialog, containing either another page within our site or direct HTML.
This post will explain how to pass information back and forth between the page creating the dialog and the page displayed within that dialog.
Firstly lets take a look at the JavaScript on our calling page. This could be added through any of the normal methods of inserting JavaScript into a SharePoint page.
(function() {

	// Use jQuery to wait for the DOM to be ready
	$(document).ready(function(){

		// Use SharePoint's SOD (script on demand) to wait for SharePoint to be ready
		ExecuteOrDelayUntilScriptLoaded(function() {

			//Create an options object (valid options properties reference - http://msdn.microsoft.com/en-us/library/ff410058(v=office.14).aspx):
			var options = SP.UI.$create_DialogOptions();

			options.title = "My dialog";
			options.autoSize = true;
			options.url = "/pages/myPage.aspx";

			//arguments to pass in to dialog (standard anonymous object)

			options.args = {
				someKey: "Some Value",
				someOtherKey: "Some Other Value"
			}

			//callback to handle the result from the dialog, you process the result of your
			//dialog from the origin page.

			options.dialogReturnValueCallback = function(result, arguments) {
				if (result == SP.UI.DialogResult.OK) {

					// Our arguments parameter contains the arguments originally passed to the dialog, so we could
					// reference arguments.someOtherKey here for instance and it would contain the value "Some Other Value"

					SP.UI.Notify.addNotification("OK Button clicked");

				} else if (result == SP.UI.DialogResult.Cancel) {

					SP.UI.Notify.addNotification("Cancel button clicked");

				}
			}

			// Create the dialog with options.
			SP.UI.ModalDialog.showModalDialog(options);

		}, "SP.UI.Dialog.js");

	});

})();
As you can see, there are 3 major parts to this, the options object, the args object and the callback.
The options object is created using the SP.UI.$create_DialogOptions() factory, although I have seen people using an empty object without apparent issue.
Into this you set various options affecting the way the dialog is presented, such as title, size and the url to the page to be displayed. A list of available options is posted on MSDN.
The args object is actually a property of the options object, and can be any sort of JavaScript object, be it an anonymous object like in our example above, or a closure, or a data model or anything else you may wish to send. This object will be available within the page shown in your dialog.
The last part is the callback, this is also a property set against the options object, and is a callback method executed when the DialogClose() method is called from within the parent page.
It takes two parameters, the result which should be one of the members of the SP.UI.DialogResult enumeration and the arguments, which can be any kind of variable or object returned from the dialog page.
Additionally in here you can call SP.UI.ModalDialog.RefreshPage() – this method takes a single parameter and is designed to be called using the result value from your callback. This method ensures that the page refreshes if the result is equal to SP.UI.DialogResult.OK
With these three sections we can define how our dialog looks, what data it takes in, and what happens once it is closed and how to process the data that comes back from it.
Lastly the dialog itself is opened using the call to SP.UI.ModalDialog.showModalDialog()
Now lets take a look at the other side of the coin, here’s the JavaScript code to run within the dialog page.
(function() {

	// As on the parent page, wait for the DOM and SharePoint to be ready before doing anything.
	$(document).ready(function() {
		ExecuteOrDelayUntilScriptLoaded(function() {

			// retrieve a reference to the page that called us.

			var _parent = SP.UI.ModalDialog.get_childDialog();

			// If this is false, then chances are you have browsed to the page directly rather than
			// loaded it in a modal window.
			if (_parent) {

				// Pull through the arguments sent to the dialog.
				var args = _parent.get_args();

				// set a red alert status line with our argument.
				var status = SP.UI.Status.addStatus("someKey:", args.someKey);
				SP.UI.Status.setStatusPriColor(status, "red");

				// Add handlers for our ok and cancel buttons
				$("#okButton").click(function() {
					// This closes the modal dialog and runs the callback method defined on the parent page.
					SP.UI.ModalDialog.commonModalDialogClose(SP.UI.DialogResult.OK, args);
				});

				$("#cancelButton").click(function() {
					SP.UI.ModalDialog.commonModalDialogClose(SP.UI.DialogResult.Cancel, "cancel clicked");
				});

			}

		}, "SP.UI.Dialog.js");
	});
})();
This again is fairly simple, we first of all get a reference to the calling page in the variable _parent. Then if that has been successful we pull in the args object from our options variable above.
Once at this point the world is your oyster, you can use the arguments from the parent page however you wish to display the dialog or interact with your users.
To close the dialog you can use SP.UI.ModalDialog.commonModalDialogClose(). This again takes two parameters, the first should be a member of the SP.UI.DialogResult enumeration, the second can be any object to send back, these map to the variables sent to our callback function above.
Additionally in here I have made use of some of the other neat parts of the SP.UI namespace such as the status bar and notification system. These are beyond the scope of this post but they’re pretty awesome and you should go read about them.
So there we go, by now you should be able to add true SharePoint style dialogs to your pages with minimal effort.
via Chris on SharePoint http://spchris.com/2013/04/dr-popup-or-how-i-learned-to-stop-worrying-and-love-the-modal-dialog/
 SharePoint and Project Server Consultant
This article has been cross posted from spchris.com (original article) |

Where is the Project Fields web part in #ProjectServer 2013? #PS2013 #SP2013
|
I am a Project Server and SharePoint consultant but my main focus currently is around Project Server.
I have been working with Project Server for nearly five years since 2007 for a Microsoft Gold Certified Partner in the UK, I have also been awared with the Microsoft Community Contributor Award 2011. I am also a certified Prince2 Practitioner. This article has been cross posted from pwmather.wordpress.com (original article) |
A quick post to highlight a minor change to the PWA web parts in 2013. I was in the process of creating a new PDP on a 2013 environment and I wanted to add certain custom fields. In 2010 the web part that enabled you to do this was the Project Fields web part:

In 2013 this web part doesn’t exist, well it does but it is no longer called Project Fields, it is now called Basic Info:

It provides exactly the same functionality as the Project Fields web part in 2010.
Hopefully that will save you hunting around for this web part ![]()

![]()

#ProjectServer 2013 linking list items to tasks and other list items #PS2013 #SP2013
|
I am a Project Server and SharePoint consultant but my main focus currently is around Project Server.
I have been working with Project Server for nearly five years since 2007 for a Microsoft Gold Certified Partner in the UK, I have also been awared with the Microsoft Community Contributor Award 2011. I am also a certified Prince2 Practitioner. This article has been cross posted from pwmather.wordpress.com (original article) |
The linking functionality has changed in Project Server 2013, in Project Server 2010 you used to create the links on the Custom Commands tab as shown below:

In 2013 this feature has been updated and no longer exists on the new or edit forms. This blog post covers how you can links items in 2013 using the web interface.
Firstly we will look at how you do this from one of the lists, in this example we will use the Issues list. As you can see in the image below, I have 2 issues:

To link Issue 1 to a task in the project, click Issue 1 and you will see the following page:

Click Add Related Item:

Double click Tasks:

Select the task required and click Insert:

Issue 1 will now show task T1 as the related item:

Clicking T1 will load the display form for T1 and show Issue 1 as the related item:

The project schedule in PWA will show the Issue icon that links to the Issue (same as 2010):

It is the same process described above to link Issues to Risks or Risks to Issues etc.
The second method to link tasks to issues is from the Tasks list on the project site:

Click one of the tasks:

Click Show More:

Click Add Related Item and follow the same steps above to select the related item.
The third method is from the schedule page in PWA. Select the task from the grid and click the Options tab:

Click the Related Items button on the ribbon and that task will open from the task list on the project site:

Notice this time the Related Items is displaying by default. This is due to &ShowRelatedItems=1 being appended to the URL. Now follow the same steps detailed above to select the related item.
Slightly more steps to link items but very simple.

![]()

Switch to #ProjectServer #Permission mode from #SharePoint permission mode
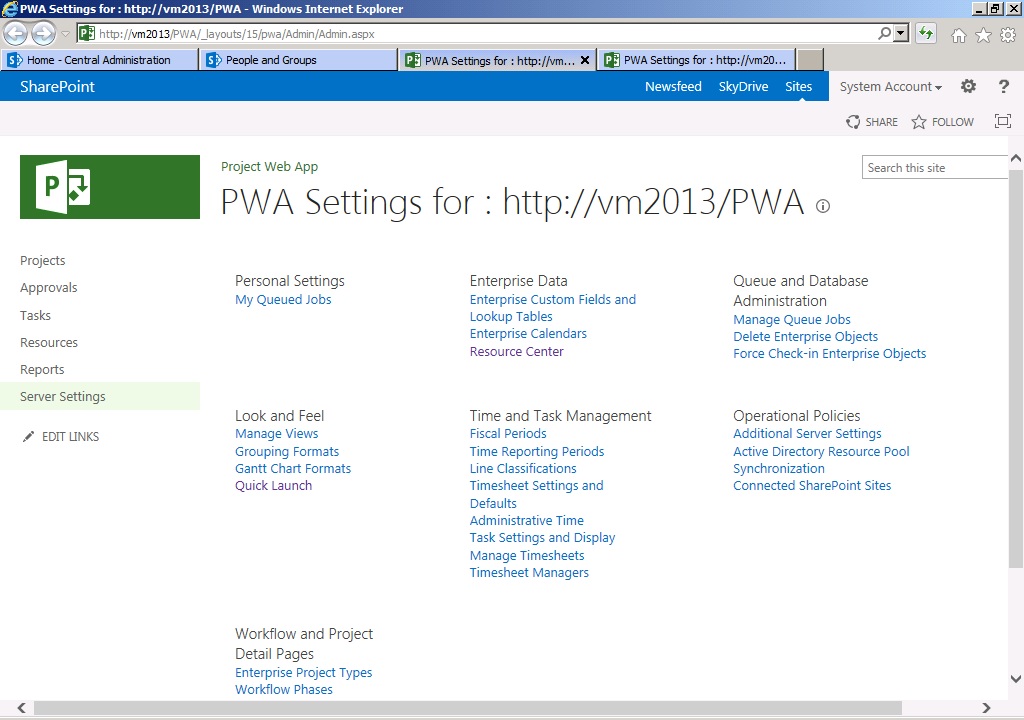
This post will help you to find key feature of Project Server 2013, Security Settings in Project Server 2013, that used to be under server settings of Project Server 2010.
With the introduction to new security mode in Project Server 2013, i.e. :SharePoint Permission mode, your new PWA by default will provision with SharePoint permission mode and hence you will find Security section missing from PWA server settings page.
Advantages, and what is enabled and what is not, while staying with SharePoint security mode are detailed here: http://technet.microsoft.com/en-us/library/fp161361.aspx
Out of the above article, and with R&D i have done so far, the major features you were not be able to use in SharePoint security mode are as follows:
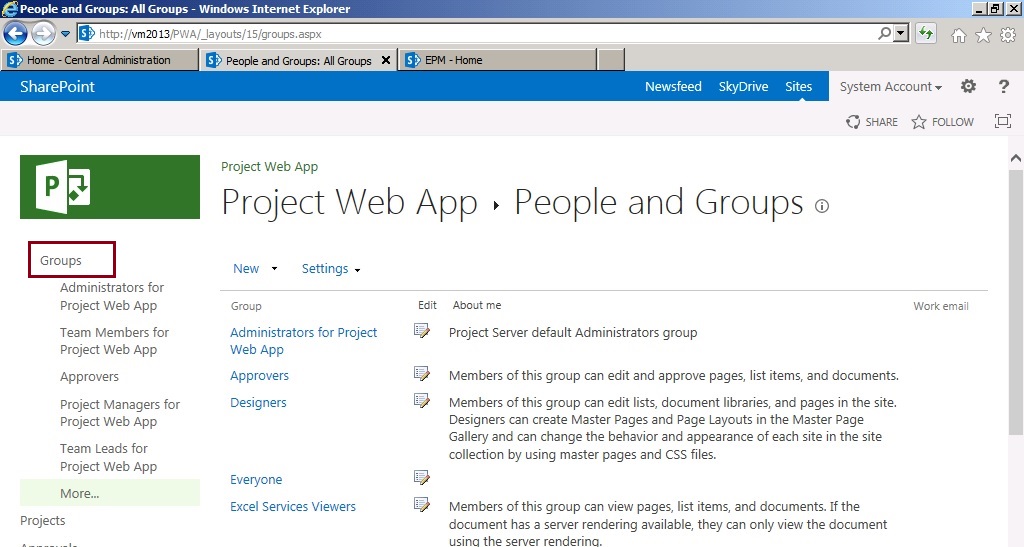
- Unable to edit default permission of groups
- RBS
- categories
- Delegation
-
Administrator
-
Portfolio Managers
-
Portfolio Viewers
-
Project Managers
-
Resource Managers
-
Team Leads
-
Team Members
In order to switch the permission mode back to Project mode, use the following windows powershell cmdlet:
Set-SPProjectPermissionMode [-Url] <Uri> [-Mode] <SharePoint | ProjectServer | UninitializedSharePoint | UninitializedProjectServer> [[-AdministratorAccount] <String>] [-AssignmentCollection <SPAssignmentCollection>]
For detail of above cmdlet, see this technet article:: http://technet.microsoft.com/en-us/library/jj219486.aspx
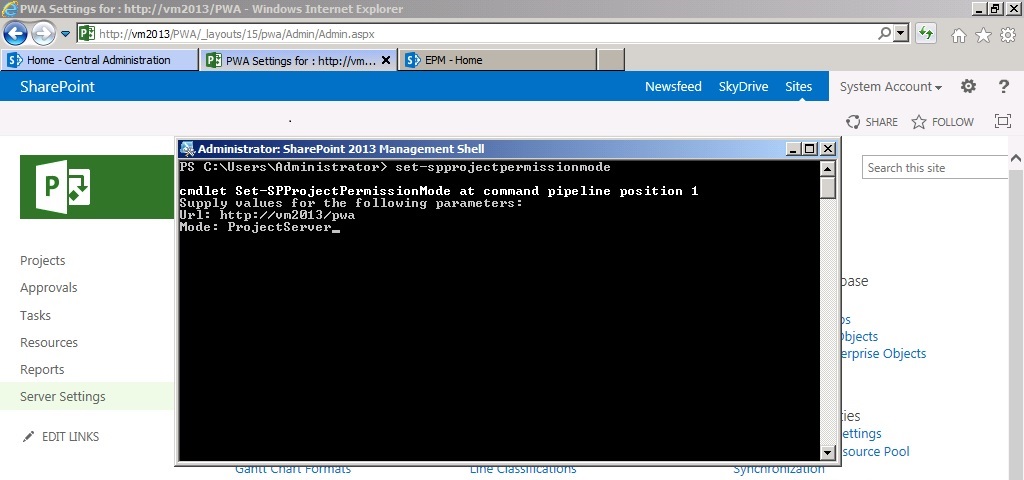
Once the prompt will be back after execution, refresh the PWA server settings page to see the Security group available to be used.

Note that Switching security modes deletes all permissions configuration information for the specified Project Web App instance and reverts to the default settings for the specified mode. You need to be carefully planning this well in advance that which security mode you have to configure.
via All about Enterprise Project Management (EPM) http://khurramjamshed.blogspot.com/2013/04/switch-to-projectserver-permission-mode.html
|
The author of the blog has an extensive experience of working as an EPM Consultant. Currently he is located in Dubai, UAE and working for Microsoft partner organization as Project Server specialist. He has a thorough experience of providing Project Management technical/functional consultancy to all sort of organizations. He is a certified PMP, a Project Server MCITP, and also received a MS community contributor award 2011.
This article has been cross posted from khurramjamshed.blogspot.com/ (original article) |

Collection of #Powershell Scripts for Sharepoint #ContentType #CTHub #Sites #Lists
In my current client project I had to design a Sharepoint portal with many lists and libraries that will eventually be re-usable across the organisation (ie the same lists structure will be used by several sites, sub-sites under several site collections and potentially in separate web applications), therefore using the SharePoint Content Type Hub was the obvious built-in solution to keep the Content Types centrally managed. However you will find out that using the browser to perform the tasks to edit the content types and publish them to all sites can become a major time consuming and if like me you don’t like to click twice to achieve the same thing, the need to automate those edits is paramount. Powershell to the rescue, here are the main scripts I use for manipulating Content Types, pushing them, but also others such as create new web application, new site collection, managed path, content type and more.
(click each “expand source” section to grab the scripts)- Add Sharepoint Snap-In to Powershell
Add-PsSnapin Microsoft.SharePoint.PowerShell
 [System.Reflection.Assembly]::LoadWithPartialName('Microsoft.SharePoint')
- Activate Taxonomy feature option under Site Collection Administration
# Activate Content TypeHub option under Site Collection Administration
stsadm -o activatefeature -id 73EF14B1-13A9-416b-A9B5-ECECA2B0604C -url http://MySharePointSrv.com/sites/sitecol1
- Unpublish All Content Types containing Custom Group Name
$HubUrl = “http://cthub.MySharePointSrv.com”
$HubSite = Get-SPSite $HubUrl
$HubWeb = $HubSite.RootWeb
$Publisher = New-Object Microsoft.SharePoint.Taxonomy.ContentTypeSync.ContentTypePublisher($HubSite)
$ContentTypes = $HubWeb.ContentTypes
foreach ($ContentType in $ContentTypes)
{
        $contentTypeGroup = $ContentType.Group
        $contentTypeName = $ContentType.Name

		# only publish the nMySharePointSrv Conten Types
		if ( $contentTypeGroup  -like '*MyCustomGroupName*')
		{
			 $Publisher.Unpublish($ContentType)
             echo "UNPUBLISHED [CONTENT TYPE GROUP] $contentTypeGroup, $contentTypeName"
		}
 }
$HubSite.Dispose()
- (re)Publish All Content Types containing Custom Group Name to Subscribing web application
$HubUrl = “http://cthub.MySharePointSrv.com”
$HubSite = Get-SPSite $HubUrl
$HubWeb = $HubSite.RootWeb
$Publisher = New-Object Microsoft.SharePoint.Taxonomy.ContentTypeSync.ContentTypePublisher($HubSite)
$ContentTypes = $HubWeb.ContentTypes
foreach ($ContentType in $ContentTypes)
{
        $contentTypeGroup = $ContentType.Group
        $contentTypeName = $ContentType.Name

		# only publish the nMySharePointSrv Conten Types
		if ( $contentTypeGroup  -like '*MyCustomGroupName*')
		{
			 $Publisher.Publish($ContentType)
             echo "PUBLISHED [CONTENT TYPE GROUP] $contentTypeGroup, $contentTypeName"
		}

    }

$HubSite.Dispose()
- Force the Publish content types from Content Type Hub to a target web application (instead of waiting for job to start on schedule
# http://get-spscripts.com
#Run the Content Type Hub timer job
$ctHubTJ = Get-SPTimerJob "MetadataHubTimerJob"
$ctHubTJ.RunNow()

#Run the Content Type Subscriber timer job for a specific Web Application
$ctSubTJ = Get-SPTimerJob "MetadataSubscriberTimerJob" -WebApplication http://MySharePointSrv.com
$ctSubTJ.RunNow()
 echo "Metadata Hub Job initiated"
- Read a text file that lists some files to be used as Content Types, iterates through each files and its create contents
The IMPORTFILES.TXT has this format
| doc1 – Document title1.dotx doc2 – Document title2.dotx doc3 – Document title3.dotx |
<# Create Content Type
#http://jaclynsaito.wordpress.com/2011/06/07/create-a-sharepoint-2010-content-type-using-powershell/
#>
# Set Variables
$url = "http://cthub.MySharePointSrv.com"
$cGroup = "MyContentTypes Group"
# Read list of document template to create CT
$DocumentTemplatesArray = Get-Content "C:\temp\IMPORTFILES.txt"
$CTHubSiteColl =  "http://cthub.MySharePointSrv.com"

$site = get-spsite $url

$web = $site.openweb()

$ctypeParent = $web.availablecontenttypes["Document"]

 # Loop thru the number of CT to create
$i = 0
$MaxCT = $DocumentTemplatesArray.count  # total CT to create
 write-host "--------" + $DocumentTemplatesArray.count total lines read from file + "-------"+
foreach ($line in $DocumentTemplatesArray)
{
    $templateURL = "/DocumentTemplates/" + $ctypeName   # URL of templatefile with extension
    $ctypeName = $line.replace(".doc","").replace(".xls","").replace(".vst","").replace(".xltx","")   #name of CT without extension

    Write-Host $i + ": " + $ctypeName

    $ctype = new-object Microsoft.SharePoint.SPContentType($ctypeParent, $web.contenttypes, $ctypeName)

    $web.contenttypes.add($ctype)

    # ADD CUSTOM COLUMN
     $web.fields.add(“myField”, ([Type]“Microsoft.SharePoint.SPFieldType”)::Text, $false)
     $field = $web.fields.getfield(“myField”)
     $fieldLink = new-object Microsoft.SharePoint.SPFieldLink($field)
     $ctype.fieldlinks.add($fieldLink)

    #   set the current document template file to be the document tmeplate
    $ctype.DocumentTemplate = $templateURL
    $ctype.Group = $cGroup  # give GroupName

    <# Publish Content Type  #http://www.jeffholliday.com/2011/08/powershell-script-create-content-type.html #>#
    write-Host "---- now publish to : " + $CTHubSiteColl
    $Publisher = New-Object Microsoft.SharePoint.Taxonomy.ContentTypeSync.ContentTypePublisher($CTHubSiteColl)

    $Publisher.Publish($ctype);

    #   update the content type
    $ctype.Update()
     $i++
 }

 # END OF LOOP TO CREATE CT
$web.Dispose()
$site.Dispose()
- Create a new Web Application
# Declare  Variables
$siteName = “SP - MyWebApp.sharepoint.com”
 $port = 80
 $hostHeader = “MyWebApp.sharepoint.com”
 $path = “d:\dedicateddrive\MyWebApp.sharepoint.com”
 $url = “http://MyWebApp.sharepoint.com:80”
 $appPoolName = “SP - MyWebApp.sharepoint.com”
 $managedAccount = “sharepoint\Sharepoint-WebApp-MA”
 $dbServer = “Sharepoint-SQL”
 $dbName = “Sharepoint-MyWebApp”
 $allowAnonymous = $false
 $authenticationMethod = “NTLM”
 $ssl = $false
#Create the Web app
New-SPWebApplication -Name $siteName -Port $port -HostHeader $hostHeader -Path $Path -URL $url -ApplicationPool $appPoolName -ApplicationPoolAccount (Get-SPManagedAccount “$managedAccount”) -DatabaseName $dbName -DatabaseServer $dbServer -AllowAnonymousAccess: $allowAnonymous -AuthenticationMethod $authenticationMethod -SecureSocketsLayer:$ssl
</div>
- Convert existing Web Application from classic-mode to claims-based authentication
 # http://technet.microsoft.com/en-us/library/gg251985(v=office.14).aspx

#set the specified user account as an administrator for the site
$WebAppName = "http://MySharePointSrv.com"
$wa = get-SPWebApplication $WebAppName
$wa.UseClaimsAuthentication = $true
$wa.Update()

#configure the policy to enable the user to have full access
$account = "MySharePointSrv\SPSetup"
$account = (New-SPClaimsPrincipal -identity $account -identitytype 1).ToEncodedString()
$wa = get-SPWebApplication $WebAppName
$zp = $wa.ZonePolicies("Default")
$p = $zp.Add($account,"PSPolicy")
$fc=$wa.PolicyRoles.GetSpecialRole("FullControl")
$p.PolicyRoleBindings.Add($fc)
$wa.Update()

#Migrate users
$wa.MigrateUsers($true)

$wa.ProvisionGlobally()
- Create a new Managed Path
$ManagedPath = "/teams"
$WebApplication= "http://MySharePointSrv.com"
 New-SPManagedPath -RelativeURL $ManagedPath -WebApplication $WebApplication
- Create a new Site Collection
# ---- CONFIGURATION BLOCK ----
$WebApplication= "http://MySharePointSrv.com"
$url = "http://MySharePointSrv.com"
$ContentDatabase = "SP-ContentDB1"
$WebsiteName = "MyNewWebApp"
$WebsiteDesc = ""
$Template = "STS#1"
    # STS#0 Team site
	# STS#1 Blank site
    # enter the command GET-SPWebTemplate to choose different template

# the username, display name, and email address
$PrimaryLogin = "MySharePointSrv\SPSetup"
$PrimaryDisplay = "SPSetup"
$PrimaryEmail = "Sharepoint@MySharePointSrv.com"

# Information about the secondary site collection administrator (Secondary Owner)
$SecondaryLogin = "MySharePointSrv\SPAdmin"
$SecondaryDisplay = "SPAdmin"
$SecondaryEmail = "Sharepoint@MySharePointSrv.com"

# Names of the default Members and Viewers groups
$MembersGroup = "$WebsiteName Members"
$ViewersGroup = "Viewers"
# ---- END OF VARIABLES ----

# You should not have to change any of the remaining code
# Unless you want to change the functionality of the script itself

# Create New Managed Path /
# New-SPManagedPath -RelativeURL "/site1" -WebApplication $WebApplication

Write-Host "Creating ContentDatabase "$ContentDatabase "......"
# Create new Content DB
New-SPContentDatabase -Name $ContentDatabase -WebApplication $WebApplication

Write-Host "Creating SiteCollection "$url"......"
# Create New Site Collection in same Content Database
New-SPSite -Url $url –ContentDatabase $ContentDatabase -Name $WebsiteName –Description $WebsiteDesc  -Template $Template -OwnerAlias $PrimaryLogin –OwnerEmail $PrimaryEmail -SecondaryOwnerAlias $SecondaryLogin -SecondaryEmail $SecondaryEmail

# default groups (Visitor, Members, and Owners)
$web = Get-SPWeb $url
$web.CreateDefaultAssociatedGroups($PrimaryLogin,$SecondaryLogin,"")

$PrimaryAdmin = Get-SPUser $PrimaryLogin -Web $url
$PrimaryAdmin.Name = $PrimaryDisplay
$PrimaryAdmin.Update()
$SecondaryAdmin = Get-SPUser $SecondaryLogin -Web $url
$SecondaryAdmin.Name = $SecondaryDisplay
$SecondaryAdmin.Update()

# Finish by disposing of the SPWeb object to be a good PowerShell citizen
$web.Dispose()
- Create a Sites and Sub-sites from an XML file
source: http://geekswithblogs.net/Norgean/archive/2012/04/12/creating-sharepoint-sites-from-xml-using-powershell.aspx Create the structure in websites.XML:
<Sites>
<Site Name="Test 1" Url="Test1" />
<Site Name="Test 2" Url="Test2" >
<Site Name="Test 2 1" Url="Test21" >
<Site Name="Test 2 1 1" Url="Test211" />
<Site Name="Test 2 1 2" Url="Test212" />
</Site>
</Site>
<Site Name="Test 3" Url="Test3" >
<Site Name="Test 3 1" Url="Test31" />
<Site Name="Test 3 2" Url="Test32" />
<Site Name="Test 3 3" Url="Test33" >
<Site Name="Test 3 3 1" Url="Test331" />
<Site Name="Test 3 3 2" Url="Test332" />
</Site>
<Site Name="Test 3 4" Url="Test34" />
</Site>
</Site>
Read this structure in Powershell, and recursively create the sites. with a progress dialog barre, too. (enter the command GET-SPWebTemplate to choose different template)
</pre>

$url = "http://MySharePointSrv.com"
$PathFile = "C:\Powershell\websites.xml"
$SiteTemplate = "BLANKINTERNET#2" <# BLANKINTERNET#2 #>

$snap = Get-PSSnapin | Where-Object { $_.Name -eq "Microsoft.SharePoint.Powershell" }
if ($snap -eq $null)
{
 Add-PSSnapin "Microsoft.SharePoint.Powershell"
}

function CreateSites($baseUrl, $sites, [int]$progressid)
{
 $sitecount = $sites.ChildNodes.Count
 $counter = 0
 foreach ($site in $sites.Site)
 {
 Write-Progress -ID $progressid -Activity "Creating sites" -status "Creating $($site.Name)" -percentComplete ($counter / $sitecount*100)
 $counter = $counter + 1

Write-Host "Creating $($site.Name) $($baseUrl)/$($site.Url)"
 New-SPWeb -Url "$($baseUrl)/$($site.Url)" -AddToQuickLaunch:$false -AddToTopNav:$true -Confirm:$false -Name "$($site.Name)" -Template "$SiteTemplate" -UseParentTopNav:$true
 if ($site.ChildNodes.Count -gt 0)
 {
 CreateSites "$($baseUrl)/$($site.Url)" $site ($progressid +1)
 }
 Write-Progress -ID $progressid -Activity "Creating sites" -status "Creating $($site.Name)" -Completed
 }
}
# read an xml file
$xml = [xml](Get-Content $PathFile)
$xml.PreserveWhitespace = $false

CreateSites $url $xml.Sites 1
<pre>
- Delete sites listed in XML file
source: http://geekswithblogs.net/Norgean/archive/2012/04/12/creating-sharepoint-sites-from-xml-using-powershell.aspx Create the structure in websites.XML:
<Sites>
<Site Name="Test 1" Url="Test1" />
<Site Name="Test 2" Url="Test2" >
<Site Name="Test 2 1" Url="Test21" >
<Site Name="Test 2 1 1" Url="Test211" />
<Site Name="Test 2 1 2" Url="Test212" />
</Site>
</Site>
<Site Name="Test 3" Url="Test3" >
<Site Name="Test 3 1" Url="Test31" />
<Site Name="Test 3 2" Url="Test32" />
<Site Name="Test 3 3" Url="Test33" >
<Site Name="Test 3 3 1" Url="Test331" />
<Site Name="Test 3 3 2" Url="Test332" />
</Site>
<Site Name="Test 3 4" Url="Test34" />
</Site>
</Site>
Read this structure in Powershell, and recursively delete the sites. this time from the latest down the hierarchy and up .
</pre>

$url = "http://MySharePointSrv.com"
$PathFile = "C:\Powershell\websites.xml"

$url = "http://icon-dev.norgine.com"
$PathFile = "C:\CPS\Powershell\websites.xml"

$snap = Get-PSSnapin | Where-Object { $_.Name -eq "Microsoft.SharePoint.Powershell" }
if ($snap -eq $null)
{
Add-PSSnapin "Microsoft.SharePoint.Powershell"
}

function DeleteSites($baseUrl, $sites, [int]$progressid)
{
$sitecount = $sites.ChildNodes.Count
$counter = 0
foreach ($site in $sites.Site)
{
Write-Progress -ID $progressid -Activity "Deleting sites" -status "Deleting $($site.Name)" -percentComplete ($counter / $sitecount*100)
$counter = $counter + 1

if ($site.ChildNodes.Count -gt 0)
{
DeleteSites "$($baseUrl)/$($site.Url)" $site ($progressid +1)
}
Write-Host "Deleting $($site.Name) $($baseUrl)/$($site.Url)"
		$WebSiteIdentity = "$($baseUrl)/$($site.Url)"
	   	Remove-SPWeb -Identity $WebSiteIdentity
Write-Progress -ID $progressid -Activity "Deleting sites" -status "Deleting $($site.Name)" -Completed
}
}
# read an xml file
$xml = [xml](Get-Content  $PathFile)
$xml.PreserveWhitespace = $false

DeleteSites $url $xml.Sites 1
- Change a site collection Master Page to a Custom.master
$url = "http://MySharePointSrv.com"
$Scollection = ""
$NewMasterPage = "$Scollection/_catalogs/masterpage/Custom.master"

$web = Get-SPWeb $url
Write-Host $NewMasterPage
$web.CustomMasterUrl = $NewMasterPage
$web.MasterUrl = $NewMasterPage

$web.Update()
Write-Host "...done."

$url = "http://MySharePointSrv.com/sites/sitecol1/site1"
$Scollection = "/sites/sitecol1"
$NewMasterPage = "$Scollection/_catalogs/masterpage/custom.master"

$web = Get-SPWeb $url
Write-Host $NewMasterPage
$web.CustomMasterUrl = $NewMasterPage
$web.MasterUrl = $NewMasterPage

$web.Update()
Write-Host "...done."

$url = "http://MySharePointSrv.com/teams/IT"
$Scollection = "/teams/IT"
$NewMasterPage = "$Scollection/_catalogs/masterpage/custom.master"

$web = Get-SPWeb $url
Write-Host $NewMasterPage
$web.CustomMasterUrl = $NewMasterPage
$web.MasterUrl = $NewMasterPage

$web.Update()
Write-Host "...done."

$url = "http://MySharePointSrv.com/sites/sitecol1"
$Scollection = "/sites/sitecol1"
$NewMasterPage = "$Scollection/_catalogs/masterpage/custom.master"

$web = Get-SPWeb $url
Write-Host $NewMasterPage
$web.CustomMasterUrl = $NewMasterPage
$web.MasterUrl = $NewMasterPage

$web.Update()
Write-Host "...done."

$url = "http://MySharePointSrv.com/sites/sitecol1/template"
$Scollection = "/sites/sitecol1"
$NewMasterPage = "$Scollection/_catalogs/masterpage/custom.master"

$web = Get-SPWeb $url
Write-Host $NewMasterPage
$web.CustomMasterUrl = $NewMasterPage
$web.MasterUrl = $NewMasterPage

$web.Update()
Write-Host "...done."
- Remove site columns
# Set Variables
$url = "http://cthub.MySharePointSrv.com"
$siteColumnsList = "myField"  # Specify a list of Site Column Names to be deleted, seperated by ;

$site = new-object Microsoft.SharePoint.SPSite($url)
 $array = $siteColumnsList.Split(";")

$site = get-spsite $url

$web = $site.openweb()
 # go thru each content type to remove column
    foreach ($ctype in $web.ContentTypes)
     {
        foreach($colms in $array)
         {
          try
          {
            #Get link to the columnn from the web
            $spFieldLink = New-Object Microsoft.SharePoint.SPFieldLink ($web.Fields[$colms])

            #Remove the column from the content type and update
            $ct.FieldLinks.Delete($spFieldLink.Id)
            $ct.Update()

             # below 2 lines is to delete from Site, when not in a ContentType
           # $column = $site.rootweb.Fields[$colms]
           # $site.rootweb.Fields.Delete($column)
           Write-Host $column.Title "deleted successfully."
          }
          catch [System.Exception]
          {
           Write-Host $column.Title "deleted failed."
           #Best Attempt to Remove Site Columns
          }
         }
     }
$site.Dispose()

![]()
via François on Sharepoint http://sharepointfrancois.wordpress.com/2013/04/23/collection-of-powershell-scripts-for-sharepoint-contenttype-cthub-sites-lists/
 French native Sharepoint Consultant living in London. A crossway between a designer, developer and system architect. Prefers stretching the limit of out-of-the-box features rather than breaking them into code. When not working with Microsoft Sharepoint François is often found on Web2.0 News sites and related social networking tools.
This article has been cross posted from sharepointfrancois.wordpress.com/ (original article) |

#Project #MVP Award #ProjectServer #SharePoint #PS2013# SP2013
|
I am a Project Server and SharePoint consultant but my main focus currently is around Project Server.
I have been working with Project Server for nearly five years since 2007 for a Microsoft Gold Certified Partner in the UK, I have also been awared with the Microsoft Community Contributor Award 2011. I am also a certified Prince2 Practitioner. This article has been cross posted from pwmather.wordpress.com (original article) |
I am very pleased to announce that I was awarded the MVP award for Project in April 2013. I am grateful for such recognition for doing something I really enjoy, helping out fellow Project Server community members. I have been holding off announcing the award as my surname is wrong on the award, it states Paul Mathers instead of Paul Mather. This is something that is being corrected but will take time.

I look forward to continuing helping out in the Project,Project Server and SharePoint communities. ![]()

![]()

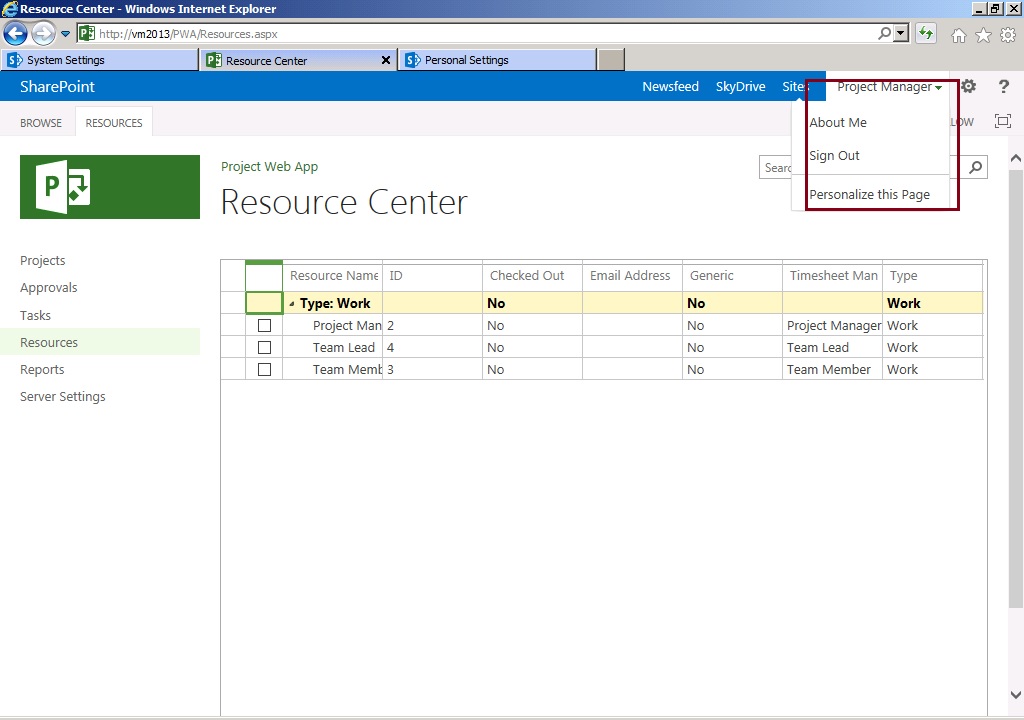
Sign-in as different user on #SharePoint Server 2013 or #ProjectServer 2013
- Caching Problems
- Documents opened in external applications are saved with an unexpected user account
- Page content shows information from the previous user due to cached information
- Session variables contain information from previous user as the cookies are not cleared
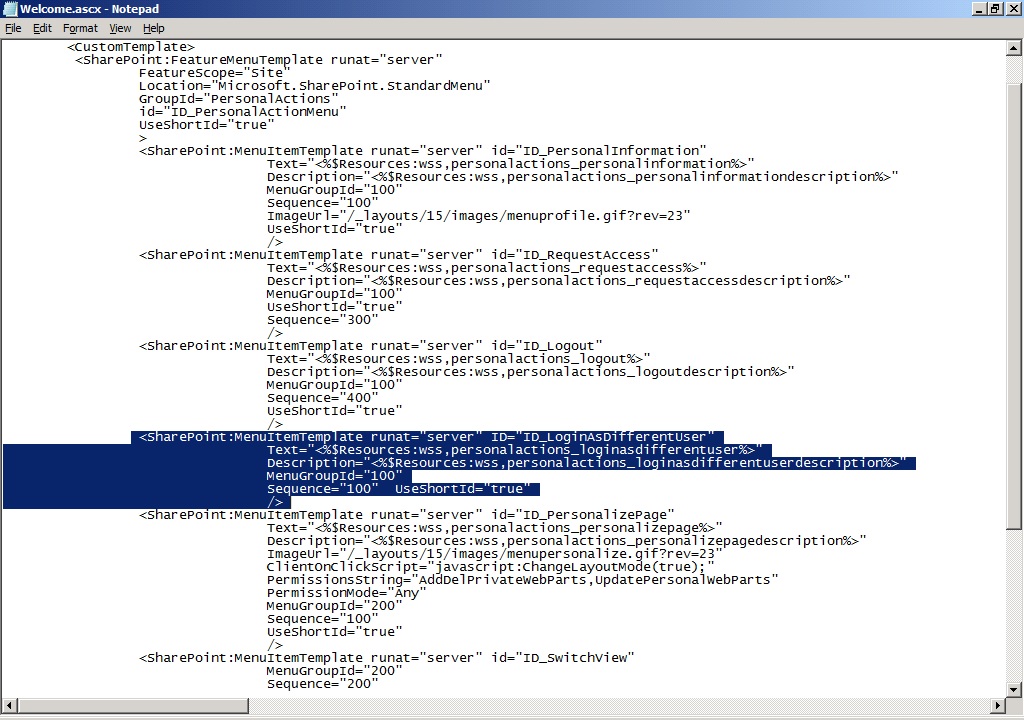
- Locate and then open the following file in a text editor: C:\Program Files\Common Files\Microsoft Shared\Web Server Extensions\15\TEMPLATE\CONTROLTEMPLATES\welcome.ascx

- Open the file in Notepad and add the following lines to the file: also see the screen shot for this modification.
- As a final step, refresh the page and the option will apparently start appearing for you to be used.

via All about Enterprise Project Management (EPM) http://khurramjamshed.blogspot.com/2013/04/sign-in-as-different-user-on-sharepoint.html
|
The author of the blog has an extensive experience of working as an EPM Consultant. Currently he is located in Dubai, UAE and working for Microsoft partner organization as Project Server specialist. He has a thorough experience of providing Project Management technical/functional consultancy to all sort of organizations. He is a certified PMP, a Project Server MCITP, and also received a MS community contributor award 2011.
This article has been cross posted from khurramjamshed.blogspot.com/ (original article) |


You must be logged in to post a comment.