Switch to #ProjectServer #Permission mode from #SharePoint permission mode
This post will help you to find key feature of Project Server 2013, Security Settings in Project Server 2013, that used to be under server settings of Project Server 2010.
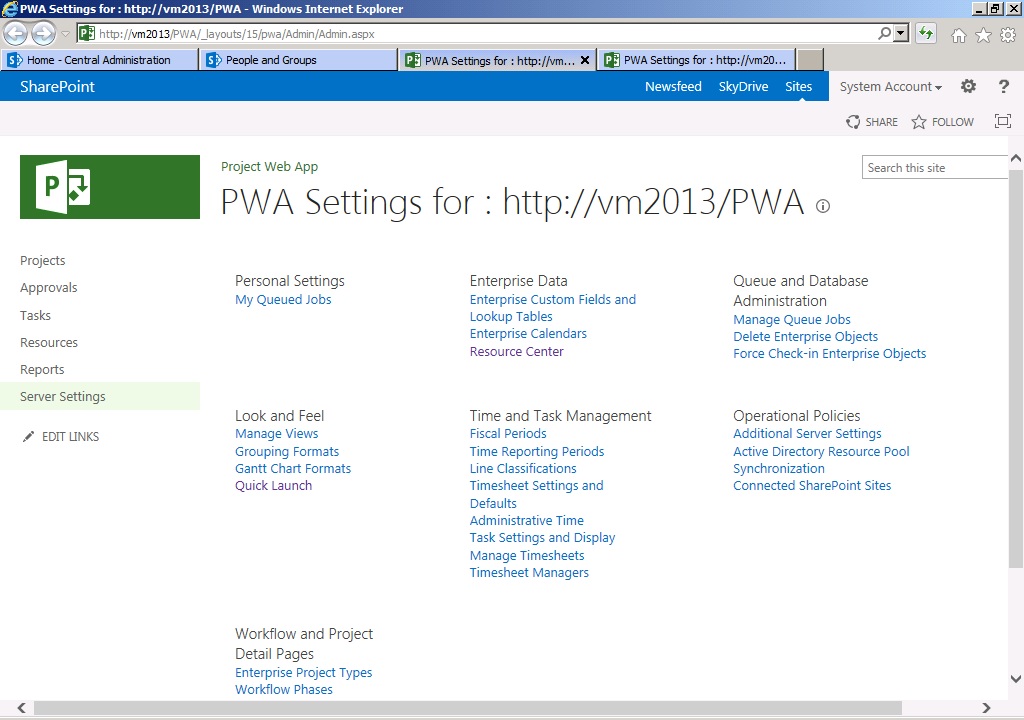
With the introduction to new security mode in Project Server 2013, i.e. :SharePoint Permission mode, your new PWA by default will provision with SharePoint permission mode and hence you will find Security section missing from PWA server settings page.
Advantages, and what is enabled and what is not, while staying with SharePoint security mode are detailed here: http://technet.microsoft.com/en-us/library/fp161361.aspx
Out of the above article, and with R&D i have done so far, the major features you were not be able to use in SharePoint security mode are as follows:
- Unable to edit default permission of groups
- RBS
- categories
- Delegation
-
Administrator
-
Portfolio Managers
-
Portfolio Viewers
-
Project Managers
-
Resource Managers
-
Team Leads
-
Team Members
In order to switch the permission mode back to Project mode, use the following windows powershell cmdlet:
Set-SPProjectPermissionMode [-Url] <Uri> [-Mode] <SharePoint | ProjectServer | UninitializedSharePoint | UninitializedProjectServer> [[-AdministratorAccount] <String>] [-AssignmentCollection <SPAssignmentCollection>]
For detail of above cmdlet, see this technet article:: http://technet.microsoft.com/en-us/library/jj219486.aspx
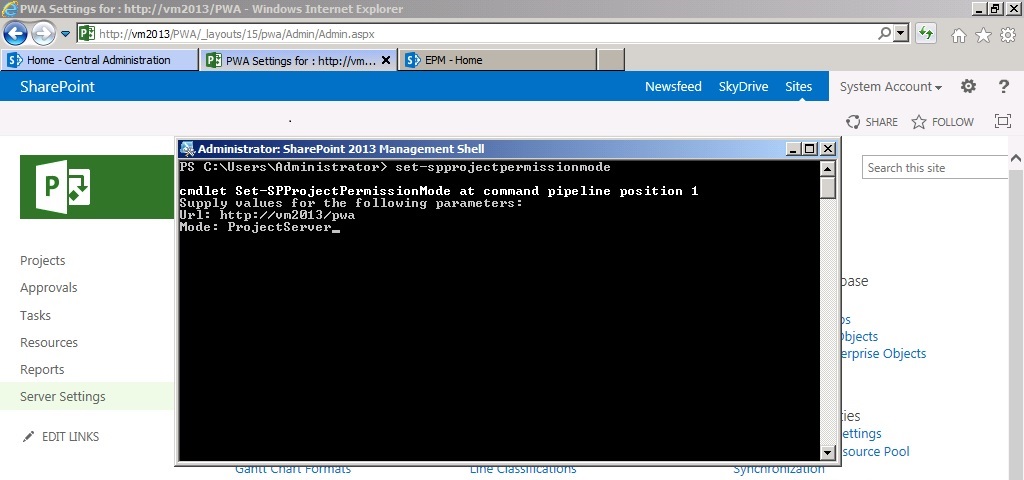
Once the prompt will be back after execution, refresh the PWA server settings page to see the Security group available to be used.

Note that Switching security modes deletes all permissions configuration information for the specified Project Web App instance and reverts to the default settings for the specified mode. You need to be carefully planning this well in advance that which security mode you have to configure.
via All about Enterprise Project Management (EPM) http://khurramjamshed.blogspot.com/2013/04/switch-to-projectserver-permission-mode.html
   The author of the blog has an extensive experience of working as an EPM Consultant. Currently he is located in Dubai, UAE and working for Microsoft partner organization as Project Server specialist. He has a thorough experience of providing Project Management technical/functional consultancy to all sort of organizations. He is a certified PMP, a Project Server MCITP, and also received a MS community contributor award 2011.
This article has been cross posted from khurramjamshed.blogspot.com/ (original article) |

Collection of #Powershell Scripts for Sharepoint #ContentType #CTHub #Sites #Lists
In my current client project I had to design a Sharepoint portal with many lists and libraries that will eventually be re-usable across the organisation (ie the same lists structure will be used by several sites, sub-sites under several site collections and potentially in separate web applications), therefore using the SharePoint Content Type Hub was the obvious built-in solution to keep the Content Types centrally managed. However you will find out that using the browser to perform the tasks to edit the content types and publish them to all sites can become a major time consuming and if like me you don’t like to click twice to achieve the same thing, the need to automate those edits is paramount. Powershell to the rescue, here are the main scripts I use for manipulating Content Types, pushing them, but also others such as create new web application, new site collection, managed path, content type and more.
(click each “expand source” section to grab the scripts)- Add Sharepoint Snap-In to Powershell
Add-PsSnapin Microsoft.SharePoint.PowerShell
 [System.Reflection.Assembly]::LoadWithPartialName('Microsoft.SharePoint')
- Activate Taxonomy feature option under Site Collection Administration
# Activate Content TypeHub option under Site Collection Administration
stsadm -o activatefeature -id 73EF14B1-13A9-416b-A9B5-ECECA2B0604C -url http://MySharePointSrv.com/sites/sitecol1
- Unpublish All Content Types containing Custom Group Name
$HubUrl = “http://cthub.MySharePointSrv.com”
$HubSite = Get-SPSite $HubUrl
$HubWeb = $HubSite.RootWeb
$Publisher = New-Object Microsoft.SharePoint.Taxonomy.ContentTypeSync.ContentTypePublisher($HubSite)
$ContentTypes = $HubWeb.ContentTypes
foreach ($ContentType in $ContentTypes)
{
        $contentTypeGroup = $ContentType.Group
        $contentTypeName = $ContentType.Name

		# only publish the nMySharePointSrv Conten Types
		if ( $contentTypeGroup  -like '*MyCustomGroupName*')
		{
			 $Publisher.Unpublish($ContentType)
             echo "UNPUBLISHED [CONTENT TYPE GROUP] $contentTypeGroup, $contentTypeName"
		}
 }
$HubSite.Dispose()
- (re)Publish All Content Types containing Custom Group Name to Subscribing web application
$HubUrl = “http://cthub.MySharePointSrv.com”
$HubSite = Get-SPSite $HubUrl
$HubWeb = $HubSite.RootWeb
$Publisher = New-Object Microsoft.SharePoint.Taxonomy.ContentTypeSync.ContentTypePublisher($HubSite)
$ContentTypes = $HubWeb.ContentTypes
foreach ($ContentType in $ContentTypes)
{
        $contentTypeGroup = $ContentType.Group
        $contentTypeName = $ContentType.Name

		# only publish the nMySharePointSrv Conten Types
		if ( $contentTypeGroup  -like '*MyCustomGroupName*')
		{
			 $Publisher.Publish($ContentType)
             echo "PUBLISHED [CONTENT TYPE GROUP] $contentTypeGroup, $contentTypeName"
		}

    }

$HubSite.Dispose()
- Force the Publish content types from Content Type Hub to a target web application (instead of waiting for job to start on schedule
# http://get-spscripts.com
#Run the Content Type Hub timer job
$ctHubTJ = Get-SPTimerJob "MetadataHubTimerJob"
$ctHubTJ.RunNow()

#Run the Content Type Subscriber timer job for a specific Web Application
$ctSubTJ = Get-SPTimerJob "MetadataSubscriberTimerJob" -WebApplication http://MySharePointSrv.com
$ctSubTJ.RunNow()
 echo "Metadata Hub Job initiated"
- Read a text file that lists some files to be used as Content Types, iterates through each files and its create contents
The IMPORTFILES.TXT has this format
| doc1 – Document title1.dotx doc2 – Document title2.dotx doc3 – Document title3.dotx |
<# Create Content Type
#http://jaclynsaito.wordpress.com/2011/06/07/create-a-sharepoint-2010-content-type-using-powershell/
#>
# Set Variables
$url = "http://cthub.MySharePointSrv.com"
$cGroup = "MyContentTypes Group"
# Read list of document template to create CT
$DocumentTemplatesArray = Get-Content "C:\temp\IMPORTFILES.txt"
$CTHubSiteColl =  "http://cthub.MySharePointSrv.com"

$site = get-spsite $url

$web = $site.openweb()

$ctypeParent = $web.availablecontenttypes["Document"]

 # Loop thru the number of CT to create
$i = 0
$MaxCT = $DocumentTemplatesArray.count  # total CT to create
 write-host "--------" + $DocumentTemplatesArray.count total lines read from file + "-------"+
foreach ($line in $DocumentTemplatesArray)
{
    $templateURL = "/DocumentTemplates/" + $ctypeName   # URL of templatefile with extension
    $ctypeName = $line.replace(".doc","").replace(".xls","").replace(".vst","").replace(".xltx","")   #name of CT without extension

    Write-Host $i + ": " + $ctypeName

    $ctype = new-object Microsoft.SharePoint.SPContentType($ctypeParent, $web.contenttypes, $ctypeName)

    $web.contenttypes.add($ctype)

    # ADD CUSTOM COLUMN
     $web.fields.add(“myField”, ([Type]“Microsoft.SharePoint.SPFieldType”)::Text, $false)
     $field = $web.fields.getfield(“myField”)
     $fieldLink = new-object Microsoft.SharePoint.SPFieldLink($field)
     $ctype.fieldlinks.add($fieldLink)

    #   set the current document template file to be the document tmeplate
    $ctype.DocumentTemplate = $templateURL
    $ctype.Group = $cGroup  # give GroupName

    <# Publish Content Type  #http://www.jeffholliday.com/2011/08/powershell-script-create-content-type.html #>#
    write-Host "---- now publish to : " + $CTHubSiteColl
    $Publisher = New-Object Microsoft.SharePoint.Taxonomy.ContentTypeSync.ContentTypePublisher($CTHubSiteColl)

    $Publisher.Publish($ctype);

    #   update the content type
    $ctype.Update()
     $i++
 }

 # END OF LOOP TO CREATE CT
$web.Dispose()
$site.Dispose()
- Create a new Web Application
# Declare  Variables
$siteName = “SP - MyWebApp.sharepoint.com”
 $port = 80
 $hostHeader = “MyWebApp.sharepoint.com”
 $path = “d:\dedicateddrive\MyWebApp.sharepoint.com”
 $url = “http://MyWebApp.sharepoint.com:80”
 $appPoolName = “SP - MyWebApp.sharepoint.com”
 $managedAccount = “sharepoint\Sharepoint-WebApp-MA”
 $dbServer = “Sharepoint-SQL”
 $dbName = “Sharepoint-MyWebApp”
 $allowAnonymous = $false
 $authenticationMethod = “NTLM”
 $ssl = $false
#Create the Web app
New-SPWebApplication -Name $siteName -Port $port -HostHeader $hostHeader -Path $Path -URL $url -ApplicationPool $appPoolName -ApplicationPoolAccount (Get-SPManagedAccount “$managedAccount”) -DatabaseName $dbName -DatabaseServer $dbServer -AllowAnonymousAccess: $allowAnonymous -AuthenticationMethod $authenticationMethod -SecureSocketsLayer:$ssl
</div>
- Convert existing Web Application from classic-mode to claims-based authentication
 # http://technet.microsoft.com/en-us/library/gg251985(v=office.14).aspx

#set the specified user account as an administrator for the site
$WebAppName = "http://MySharePointSrv.com"
$wa = get-SPWebApplication $WebAppName
$wa.UseClaimsAuthentication = $true
$wa.Update()

#configure the policy to enable the user to have full access
$account = "MySharePointSrv\SPSetup"
$account = (New-SPClaimsPrincipal -identity $account -identitytype 1).ToEncodedString()
$wa = get-SPWebApplication $WebAppName
$zp = $wa.ZonePolicies("Default")
$p = $zp.Add($account,"PSPolicy")
$fc=$wa.PolicyRoles.GetSpecialRole("FullControl")
$p.PolicyRoleBindings.Add($fc)
$wa.Update()

#Migrate users
$wa.MigrateUsers($true)

$wa.ProvisionGlobally()
- Create a new Managed Path
$ManagedPath = "/teams"
$WebApplication= "http://MySharePointSrv.com"
 New-SPManagedPath -RelativeURL $ManagedPath -WebApplication $WebApplication
- Create a new Site Collection
# ---- CONFIGURATION BLOCK ----
$WebApplication= "http://MySharePointSrv.com"
$url = "http://MySharePointSrv.com"
$ContentDatabase = "SP-ContentDB1"
$WebsiteName = "MyNewWebApp"
$WebsiteDesc = ""
$Template = "STS#1"
    # STS#0 Team site
	# STS#1 Blank site
    # enter the command GET-SPWebTemplate to choose different template

# the username, display name, and email address
$PrimaryLogin = "MySharePointSrv\SPSetup"
$PrimaryDisplay = "SPSetup"
$PrimaryEmail = "Sharepoint@MySharePointSrv.com"

# Information about the secondary site collection administrator (Secondary Owner)
$SecondaryLogin = "MySharePointSrv\SPAdmin"
$SecondaryDisplay = "SPAdmin"
$SecondaryEmail = "Sharepoint@MySharePointSrv.com"

# Names of the default Members and Viewers groups
$MembersGroup = "$WebsiteName Members"
$ViewersGroup = "Viewers"
# ---- END OF VARIABLES ----

# You should not have to change any of the remaining code
# Unless you want to change the functionality of the script itself

# Create New Managed Path /
# New-SPManagedPath -RelativeURL "/site1" -WebApplication $WebApplication

Write-Host "Creating ContentDatabase "$ContentDatabase "......"
# Create new Content DB
New-SPContentDatabase -Name $ContentDatabase -WebApplication $WebApplication

Write-Host "Creating SiteCollection "$url"......"
# Create New Site Collection in same Content Database
New-SPSite -Url $url –ContentDatabase $ContentDatabase -Name $WebsiteName –Description $WebsiteDesc  -Template $Template -OwnerAlias $PrimaryLogin –OwnerEmail $PrimaryEmail -SecondaryOwnerAlias $SecondaryLogin -SecondaryEmail $SecondaryEmail

# default groups (Visitor, Members, and Owners)
$web = Get-SPWeb $url
$web.CreateDefaultAssociatedGroups($PrimaryLogin,$SecondaryLogin,"")

$PrimaryAdmin = Get-SPUser $PrimaryLogin -Web $url
$PrimaryAdmin.Name = $PrimaryDisplay
$PrimaryAdmin.Update()
$SecondaryAdmin = Get-SPUser $SecondaryLogin -Web $url
$SecondaryAdmin.Name = $SecondaryDisplay
$SecondaryAdmin.Update()

# Finish by disposing of the SPWeb object to be a good PowerShell citizen
$web.Dispose()
- Create a Sites and Sub-sites from an XML file
source: http://geekswithblogs.net/Norgean/archive/2012/04/12/creating-sharepoint-sites-from-xml-using-powershell.aspx Create the structure in websites.XML:
<Sites>
<Site Name="Test 1" Url="Test1" />
<Site Name="Test 2" Url="Test2" >
<Site Name="Test 2 1" Url="Test21" >
<Site Name="Test 2 1 1" Url="Test211" />
<Site Name="Test 2 1 2" Url="Test212" />
</Site>
</Site>
<Site Name="Test 3" Url="Test3" >
<Site Name="Test 3 1" Url="Test31" />
<Site Name="Test 3 2" Url="Test32" />
<Site Name="Test 3 3" Url="Test33" >
<Site Name="Test 3 3 1" Url="Test331" />
<Site Name="Test 3 3 2" Url="Test332" />
</Site>
<Site Name="Test 3 4" Url="Test34" />
</Site>
</Site>
Read this structure in Powershell, and recursively create the sites. with a progress dialog barre, too. (enter the command GET-SPWebTemplate to choose different template)
</pre>

$url = "http://MySharePointSrv.com"
$PathFile = "C:\Powershell\websites.xml"
$SiteTemplate = "BLANKINTERNET#2" <# BLANKINTERNET#2 #>

$snap = Get-PSSnapin | Where-Object { $_.Name -eq "Microsoft.SharePoint.Powershell" }
if ($snap -eq $null)
{
 Add-PSSnapin "Microsoft.SharePoint.Powershell"
}

function CreateSites($baseUrl, $sites, [int]$progressid)
{
 $sitecount = $sites.ChildNodes.Count
 $counter = 0
 foreach ($site in $sites.Site)
 {
 Write-Progress -ID $progressid -Activity "Creating sites" -status "Creating $($site.Name)" -percentComplete ($counter / $sitecount*100)
 $counter = $counter + 1

Write-Host "Creating $($site.Name) $($baseUrl)/$($site.Url)"
 New-SPWeb -Url "$($baseUrl)/$($site.Url)" -AddToQuickLaunch:$false -AddToTopNav:$true -Confirm:$false -Name "$($site.Name)" -Template "$SiteTemplate" -UseParentTopNav:$true
 if ($site.ChildNodes.Count -gt 0)
 {
 CreateSites "$($baseUrl)/$($site.Url)" $site ($progressid +1)
 }
 Write-Progress -ID $progressid -Activity "Creating sites" -status "Creating $($site.Name)" -Completed
 }
}
# read an xml file
$xml = [xml](Get-Content $PathFile)
$xml.PreserveWhitespace = $false

CreateSites $url $xml.Sites 1
<pre>
- Delete sites listed in XML file
source: http://geekswithblogs.net/Norgean/archive/2012/04/12/creating-sharepoint-sites-from-xml-using-powershell.aspx Create the structure in websites.XML:
<Sites>
<Site Name="Test 1" Url="Test1" />
<Site Name="Test 2" Url="Test2" >
<Site Name="Test 2 1" Url="Test21" >
<Site Name="Test 2 1 1" Url="Test211" />
<Site Name="Test 2 1 2" Url="Test212" />
</Site>
</Site>
<Site Name="Test 3" Url="Test3" >
<Site Name="Test 3 1" Url="Test31" />
<Site Name="Test 3 2" Url="Test32" />
<Site Name="Test 3 3" Url="Test33" >
<Site Name="Test 3 3 1" Url="Test331" />
<Site Name="Test 3 3 2" Url="Test332" />
</Site>
<Site Name="Test 3 4" Url="Test34" />
</Site>
</Site>
Read this structure in Powershell, and recursively delete the sites. this time from the latest down the hierarchy and up .
</pre>

$url = "http://MySharePointSrv.com"
$PathFile = "C:\Powershell\websites.xml"

$url = "http://icon-dev.norgine.com"
$PathFile = "C:\CPS\Powershell\websites.xml"

$snap = Get-PSSnapin | Where-Object { $_.Name -eq "Microsoft.SharePoint.Powershell" }
if ($snap -eq $null)
{
Add-PSSnapin "Microsoft.SharePoint.Powershell"
}

function DeleteSites($baseUrl, $sites, [int]$progressid)
{
$sitecount = $sites.ChildNodes.Count
$counter = 0
foreach ($site in $sites.Site)
{
Write-Progress -ID $progressid -Activity "Deleting sites" -status "Deleting $($site.Name)" -percentComplete ($counter / $sitecount*100)
$counter = $counter + 1

if ($site.ChildNodes.Count -gt 0)
{
DeleteSites "$($baseUrl)/$($site.Url)" $site ($progressid +1)
}
Write-Host "Deleting $($site.Name) $($baseUrl)/$($site.Url)"
		$WebSiteIdentity = "$($baseUrl)/$($site.Url)"
	   	Remove-SPWeb -Identity $WebSiteIdentity
Write-Progress -ID $progressid -Activity "Deleting sites" -status "Deleting $($site.Name)" -Completed
}
}
# read an xml file
$xml = [xml](Get-Content  $PathFile)
$xml.PreserveWhitespace = $false

DeleteSites $url $xml.Sites 1
- Change a site collection Master Page to a Custom.master
$url = "http://MySharePointSrv.com"
$Scollection = ""
$NewMasterPage = "$Scollection/_catalogs/masterpage/Custom.master"

$web = Get-SPWeb $url
Write-Host $NewMasterPage
$web.CustomMasterUrl = $NewMasterPage
$web.MasterUrl = $NewMasterPage

$web.Update()
Write-Host "...done."

$url = "http://MySharePointSrv.com/sites/sitecol1/site1"
$Scollection = "/sites/sitecol1"
$NewMasterPage = "$Scollection/_catalogs/masterpage/custom.master"

$web = Get-SPWeb $url
Write-Host $NewMasterPage
$web.CustomMasterUrl = $NewMasterPage
$web.MasterUrl = $NewMasterPage

$web.Update()
Write-Host "...done."

$url = "http://MySharePointSrv.com/teams/IT"
$Scollection = "/teams/IT"
$NewMasterPage = "$Scollection/_catalogs/masterpage/custom.master"

$web = Get-SPWeb $url
Write-Host $NewMasterPage
$web.CustomMasterUrl = $NewMasterPage
$web.MasterUrl = $NewMasterPage

$web.Update()
Write-Host "...done."

$url = "http://MySharePointSrv.com/sites/sitecol1"
$Scollection = "/sites/sitecol1"
$NewMasterPage = "$Scollection/_catalogs/masterpage/custom.master"

$web = Get-SPWeb $url
Write-Host $NewMasterPage
$web.CustomMasterUrl = $NewMasterPage
$web.MasterUrl = $NewMasterPage

$web.Update()
Write-Host "...done."

$url = "http://MySharePointSrv.com/sites/sitecol1/template"
$Scollection = "/sites/sitecol1"
$NewMasterPage = "$Scollection/_catalogs/masterpage/custom.master"

$web = Get-SPWeb $url
Write-Host $NewMasterPage
$web.CustomMasterUrl = $NewMasterPage
$web.MasterUrl = $NewMasterPage

$web.Update()
Write-Host "...done."
- Remove site columns
# Set Variables
$url = "http://cthub.MySharePointSrv.com"
$siteColumnsList = "myField"  # Specify a list of Site Column Names to be deleted, seperated by ;

$site = new-object Microsoft.SharePoint.SPSite($url)
 $array = $siteColumnsList.Split(";")

$site = get-spsite $url

$web = $site.openweb()
 # go thru each content type to remove column
    foreach ($ctype in $web.ContentTypes)
     {
        foreach($colms in $array)
         {
          try
          {
            #Get link to the columnn from the web
            $spFieldLink = New-Object Microsoft.SharePoint.SPFieldLink ($web.Fields[$colms])

            #Remove the column from the content type and update
            $ct.FieldLinks.Delete($spFieldLink.Id)
            $ct.Update()

             # below 2 lines is to delete from Site, when not in a ContentType
           # $column = $site.rootweb.Fields[$colms]
           # $site.rootweb.Fields.Delete($column)
           Write-Host $column.Title "deleted successfully."
          }
          catch [System.Exception]
          {
           Write-Host $column.Title "deleted failed."
           #Best Attempt to Remove Site Columns
          }
         }
     }
$site.Dispose()

![]()
via François on Sharepoint http://sharepointfrancois.wordpress.com/2013/04/23/collection-of-powershell-scripts-for-sharepoint-contenttype-cthub-sites-lists/
 French native Sharepoint Consultant living in London. A crossway between a designer, developer and system architect. Prefers stretching the limit of out-of-the-box features rather than breaking them into code. When not working with Microsoft Sharepoint François is often found on Web2.0 News sites and related social networking tools.
This article has been cross posted from sharepointfrancois.wordpress.com/ (original article) |

#Project #MVP Award #ProjectServer #SharePoint #PS2013# SP2013
 I am a Project Server and SharePoint consultant but my main focus currently is around Project Server.
I have been working with Project Server for nearly five years since 2007 for a Microsoft Gold Certified Partner in the UK, I have also been awared with the Microsoft Community Contributor Award 2011. I am also a certified Prince2 Practitioner. This article has been cross posted from pwmather.wordpress.com (original article) |
I am very pleased to announce that I was awarded the MVP award for Project in April 2013. I am grateful for such recognition for doing something I really enjoy, helping out fellow Project Server community members. I have been holding off announcing the award as my surname is wrong on the award, it states Paul Mathers instead of Paul Mather. This is something that is being corrected but will take time.

I look forward to continuing helping out in the Project,Project Server and SharePoint communities. ![]()

![]()

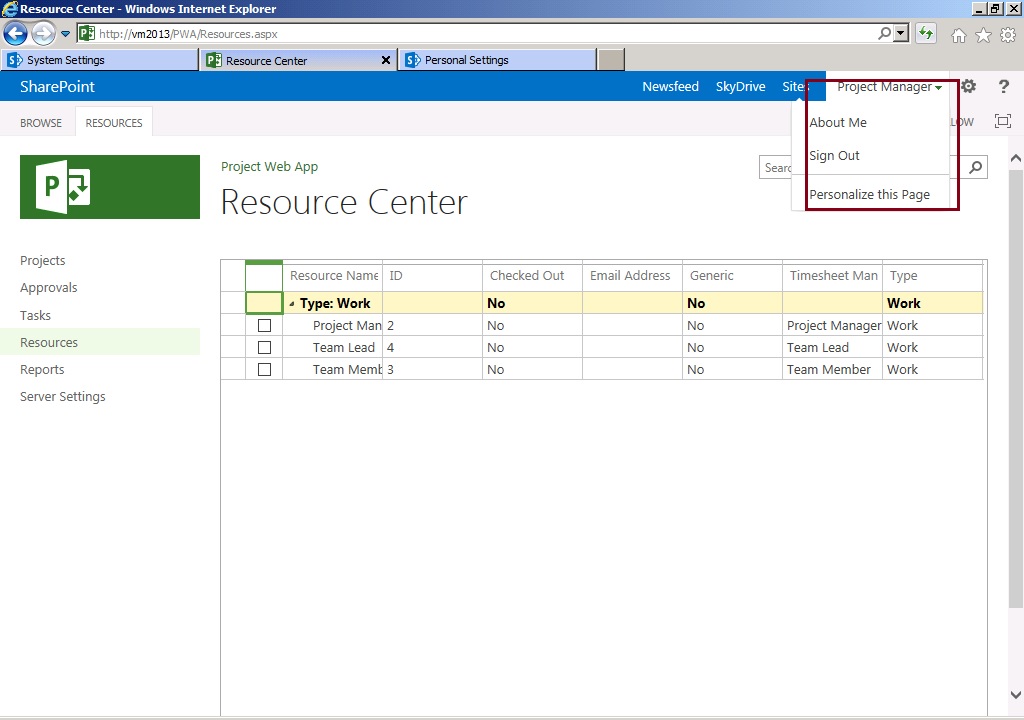
Sign-in as different user on #SharePoint Server 2013 or #ProjectServer 2013
- Caching Problems
- Documents opened in external applications are saved with an unexpected user account
- Page content shows information from the previous user due to cached information
- Session variables contain information from previous user as the cookies are not cleared
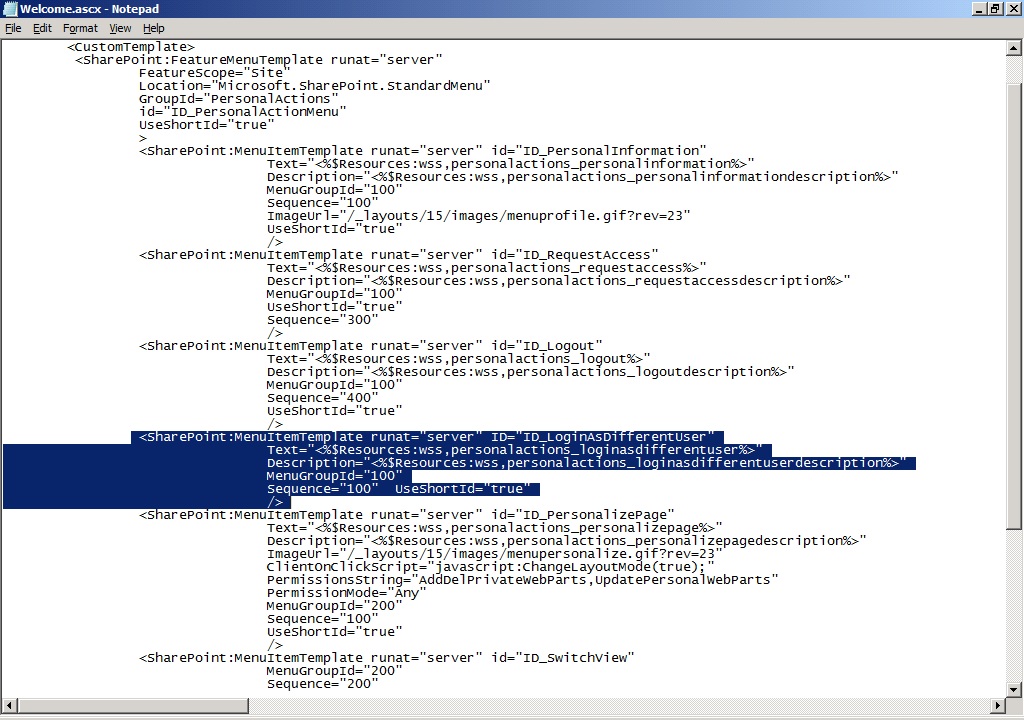
- Locate and then open the following file in a text editor: C:\Program Files\Common Files\Microsoft Shared\Web Server Extensions\15\TEMPLATE\CONTROLTEMPLATES\welcome.ascx

- Open the file in Notepad and add the following lines to the file: also see the screen shot for this modification.
- As a final step, refresh the page and the option will apparently start appearing for you to be used.

via All about Enterprise Project Management (EPM) http://khurramjamshed.blogspot.com/2013/04/sign-in-as-different-user-on-sharepoint.html
|
The author of the blog has an extensive experience of working as an EPM Consultant. Currently he is located in Dubai, UAE and working for Microsoft partner organization as Project Server specialist. He has a thorough experience of providing Project Management technical/functional consultancy to all sort of organizations. He is a certified PMP, a Project Server MCITP, and also received a MS community contributor award 2011.
This article has been cross posted from khurramjamshed.blogspot.com/ (original article) |

Using Knockout.js in a SharePoint Context
The excellent Knockout.js library is an MVVM (Model, View, ViewModel) library.
Using it you can completely abstract the logic from the presentation in your web applications, allowing dynamic and responsive UIs to be created without having to manage all of the fiddly UI updates directly.
The Knockout site has a great set of tutorials on how to use it, but I thought I would bring them into a SharePoint context.
Specifically, I am going to cover their 5th tutorial, Loading and Saving Data. In this tutorial they give the example of a simple task list that a user can update and delete dynamically. If you do not know Knockout at all, I recommend you go through this tutorial before continuing. Go ahead, I can wait.
Back with us? Excellent. Hopefully by now you have some idea of the power of Knockout, so lets try and reproduce this using a SharePoint list as the data source.
The first thing to do is to create our list. For this I am using a simple custom list named ‘My Tasks’ with an additional Completed Yes/No field, and I have pre-populated it with some entries.

Next we need to consider how we are going to create our view within our site. For my example I have chosen to simply create the view as a file in a document library, then link to it using a Content Editor Web Part. However you could do this a number of ways, you could embed your JavaScript into the master page and put your data bindings directly into a page layout, or you could create a visual web part. The possibilities are endless, this is SharePoint after all! ![]()
I put the view, along with the script references to Knockout, the ever useful jQuery and my View Model into a single file and save it into the document library. I have also put some style information in too. Here is the view model as I created it:
<style type="text/css">
#taskContainer {
width: 500px;
}
#errorBox {
text-align: center;
border: 1px solid #600;
margin-bottom: 10px;
padding: 10px;
background: #f99;
color: #600;
}
#saveBox {
text-align: center;
border: 1px solid #060;
margin-bottom: 10px;
padding: 10px;
background: #9f9;
color: #060;
}
#taskContainer ul {
padding: 10px;
background: #eaeaea;
padding: 0;
}
#taskContainer ul li {
list-style: none;
padding: 3px;
}
#taskContainer input[type=text] {
width: 390px;
}
</style>
<div id="taskContainer">
<h3>Tasks</h3>
<div id="errorBox" data-bind="text: errorMessage, visible: errorMessage"></div>
<div id="saveBox" data-bind="text: saveMessage, visible: saveMessage"></div>
Add task: <input data-bind="value: newTaskText" placeholder="What needs to be done?"/>
<button data-bind="click: addTask">Add</button>
<ul id="myTaskBox" data-bind="foreach: tasks, visible: tasks().length > 0">
<li>
<input type="checkbox" data-bind="checked: Completed" />
<input data-bind="value: Title, disable: Completed" />
<a href="#" data-bind="click: $parent.removeTask">Delete</a>
</li>
</ul>
You have <b data-bind="text: incompleteTasks().length"> </b> incomplete task(s)
<span data-bind="visible: incompleteTasks().length == 0"> - it's beer time!</span>
<button data-bind="click: save">Save</button>
</div>
<script type="text/javascript" src="../webdevdocuments/knockout.js"></script>
<script type="text/javascript" src="../webdevdocuments/jquery-1.9.1.min.js"></script>
<script type="text/javascript" src="../webdevdocuments/ViewModel.js"></script>
Note the addition of some message boxes, the original tutorial does not include them but I felt they were nicer than simple alert boxes.
Also note that, unlike the original, I have not used a form element for the new task area. This is because form elements can cause havoc in SharePoint pages, as the entire page is wrapped in a form for post-backs.
Other than that, our view is mostly unchanged.
Now, on to the JavaScript!
The main differences here lie in the way that we send and receive data from SharePoint. In their examples they use jQuery to query and post data to REST APIs, and while SharePoint 2010 and 2013 do come with their own suite of REST / oData APIs, there are some issues in using them.
- Update and Delete calls can only update or delete one item per call, to do the bulk updating this system indicates we would have to make a request per item. Not ideal!
- Due to the way SharePoint handles concurrency, you have to pass around an eTag so that SharePoint can determine if an item has been updated since requested. While this is great for high concurrency systems with multiple people editing the same data, for a personal tasks list this is not a nice feature.
Luckily REST is not our only option. SharePoint has the wonderful Client Side Object Model (CSOM), which can do all of our loading and saving for us!
Here is my View Model, updated to use the CSOM.
(function() {

	function Task(data) {
	    this.Title = ko.observable(data.Title);
	    this.Completed = ko.observable(data.Completed);

	    // An additional reference to store the SharePoint list item id.
	    this.Id = ko.observable(data.Id);
	}

	function TaskListViewModel() {
	    // Data
	    var self = this;
	    self.tasks = ko.observableArray([]);
	    self.newTaskText = ko.observable();

	    // Additional bindings to use for error and saved messages.
	    self.saveMessage = ko.observable(false);
	    self.errorMessage = ko.observable(false);

	    self.incompleteTasks = ko.computed(function() {
	        return ko.utils.arrayFilter(self.tasks(), function(task) { return !task.Completed() && !task._destroy});
	    });

	    // Operations
	    self.addTask = function() {
	        self.tasks.push(new Task({ Title: this.newTaskText(), Completed: false, Id: "New" }));
	        self.newTaskText("");
	    };

	    self.removeTask = function(task) {
			self.tasks.destroy(task)
	    };

	    self.save = function() {

	    	for (var task in self.tasks()) {

	    		var createdTasks = [];

	    		// Build a request up to send with the CSOM.

	    		if (self.tasks()[task]._destroy) {
					// Handle deleted objects
	    			// Deleted items that are marked "new" have never been saved to SharePoint to start with,
	    			if (self.tasks()[task].Id() != "New") {
			    		var listItem = taskList.getItemById(self.tasks()[task].Id());
			    		listItem.deleteObject();
	    			}
	    		} else if (self.tasks()[task].Id() == "New") {
	    			// Handle new objects to be created.

	    			var createInfo = new SP.ListItemCreationInformation();
	    			var listItem = taskList.addItem(createInfo);

	    			listItem.set_item("Title", self.tasks()[task].Title());
	    			listItem.set_item("Completed", self.tasks()[task].Completed());

	    			listItem.update();

	    			// Save a reference to both the SP.ListItem object and the KO Object so we can update
	    			// the latter with the former's ID once the object has been created.
	    			createdTasks.push({
	    				spItem: listItem,
	    				koItem: self.tasks()[task]
	    			});

	    			ctx.load(listItem);
	    		} else {
	    			// The item is neither new nor deleted, handle it as an update.
	    			var listItem = taskList.getItemById(self.tasks()[task].Id());

	    			listItem.set_item("Title", self.tasks()[task].Title());
	    			listItem.set_item("Completed", self.tasks()[task].Completed());

	    			listItem.update();
	    		}

	    	}

			// Nowe we have built our request, send it to the server for processing.
	    	ctx.executeQueryAsync(function() {

	    		// Our save was successful. Now we need to itterate through our newly
	    		// created items and ensure that Knockout knows that the ID has changed.
	    		for(var item in createdTasks) {
	    			createdTasks[item].koItem.Id(createdTasks[item].spItem.get_id());
	    		}

	    		// Set our saved message.
	    		self.saveMessage("Saved successfully");

	    	}, function(sender, args) {

	    		// Our save failed, set the error message to show then log the actual error
	    		// to the JavaScript console if it exists.
	    		self.errorMessage("Error updating list items");
	    		if (typeof console != "undefined") {
	    			console.log(args.get_message());
	    		}
	    	});

	    };

	    // Load the data from SharePoint
		// Get a context to the current site.
	    var ctx = new SP.ClientContext(_spPageContextInfo.webServerRelativeUrl);

	    var web = ctx.get_web();
	    var taskList = web.get_lists().getByTitle("My Tasks");

	    // Limit our task list to 50 tasks.
   	    var query = new SP.CamlQuery();
   	    query.set_viewXml("<View><RowLimit>50</RowLimit></View>");

   	    var taskItems = taskList.getItems(query);

   	    // Ensure the fields we want to retrieve are returned
   	    ctx.load(taskItems, "Include(ID,Title,Completed)");

   	    // Send our query to the server for processing.
   	    ctx.executeQueryAsync(function() {
   	    	var tasks = [];
   	    	var taskItemEnumerator = taskItems.getEnumerator();

   	    	// Iterate through our retrieved data set and build an array of JSON objects containing
   	    	// the relevent properties.
   	    	while (taskItemEnumerator.moveNext()) {
   	    		tasks.push(
   	    			new Task({
	   	    			Title: taskItemEnumerator.get_current().get_item("Title"),
	   	    			Completed: taskItemEnumerator.get_current().get_item("Completed"),
	   	    			Id: taskItemEnumerator.get_current().get_item("ID")
	   	    		})
	   	    	);
   	    	}

   	    	// Update the Knockout tasks array with our data from the server.
   	    	self.tasks(tasks);
   	    });

	}


	$(document).ready(function() { // I use jQuery for this, but you could add an event listener to the document object instead.
		EnsureScriptFunc("sp.js", "SP.ClientContext", function() {
			ko.applyBindings(new TaskListViewModel());
		});
	});

})();
So there you go, once you put it all together you should end up with something looking like this:

Cool, huh? It is by no means perfect. The two biggest issues with the implementation as it stands are:
- Currently I am limiting the entire system to only showing 50 records, which is not ideal. This would be best handled by adding some pagination.
- When you hit save it updates every item in the view model, regardless of whether it needs updating or not. This would be resolvable by subscribing to the Task Knockout object and keeping track of which need updating and which do not.
Additionally you could use some jQuery animation and the animated transitions example on the Knockout site to hide the save and error boxes once they are shown. Currently once they are visible they remain visible indefinitely.
Have fun with it, it’s a neat tool and can give quite powerful results.
via Chris on SharePoint http://spchris.com/2013/04/using-knockout-js-in-a-sharepoint-context/
 SharePoint and Project Server Consultant
This article has been cross posted from spchris.com (original article) |

Mastering the SharePoint 2013 Suite Bar
Today I had a requirement to alter the title in the left hand side of the Suite bar in SharePoint 2013.
This is the bar appearing at the very top of the page, by default containing the word SharePoint on the left and links to things like SkyDrive, the Newsfeed and sites you follow on the right.

In this particular scenario I was interested in changing the word SharePoint to something more meaningful, preferably customisable on a per web basis, or based upon the site collection root web’s title.
My first thought on trying to change it was to look into the master page but I could find no reference to it there, so I did a little digging and found some surprising details.
- The entire bar is a delegate control
- The left hand part of the bar is stored as a property against the Web Application
- There is no way of modifying the right hand links without writing a farm solution in .NET, or adding custom JavaScript to each page to modify the links on the fly.
While these problems are not insurmountable, it left me a little nonplussed, especially the idea that it was not possible to modify the branding uniquely per site collection or per web. However I bravely fought on, as I was really quite determined to get that heading working the way I wished.
My first test was to see what the property against the web application was called, and what it contains by default. Let’s break out our trusty SharePoint Management Console and use the following bit of PowerShell.
$webApp = Get-SPWebApplication -Identity "http://mywebapplicationurl"
$webApp.SuiteBarBrandingElementHtml
<div class="ms-core-brandingText">SharePoint</div>
This seems straight forward enough, the property is a string containing the HTML for the heading, so let’s go and update it to something else using the same window from our previous example (Re-do the Get-SPWebApplication call again if you have closed it)
$webApp.SuiteBarBrandingElementHtml = '<div class="ms-core-brandingText">My Custom Branding</div>'
$webApp.Update()
Note the call to the Update() method, without this your changes will not be applied to the Web Application.
Once done, refresh your page and you will see that your branding has updated accordingly.

So to recap, we can modify this string only on the Web application level, but when we do so, we can put HTML tags in directly, and they will be rendered to the page. Interesting!
Let’s talk about JavaScript
The ECMAScript Object Model first came into its own with SharePoint 2010, and with 2013 has gone from strength to strength. Lets see if we can’t use it to meet our requirement of at least customising the Suite bar based on the current Site Collection’s root web title.
To do this is very simple in code, take a look at the following JavaScript example:
(function() {

	// Set a default title to use if we cannot retrieve one.
	var defaultTitle = 'SharePoint';

	// Ensure that both the DOM and the Object Model are ready for us
	document.addEventListener('DOMContentLoaded', function() {
		EnsureScriptFunc('sp.js', 'SP.ClientContext', function() {

			// Instantiate our renamer.
			var t = new titleBarRenamer();

		});
	});


	function titleBarRenamer() {

		// Get and load a reference to the root web of the current site collection.
		var ctx = new SP.ClientContext.get_current();
		var site = ctx.get_site();
		var rootWeb = site.get_rootWeb();

		ctx.load(rootWeb);

		// Send our query off to SharePoint.
		ctx.executeQueryAsync(function() {

			var title = false;

			// Pull the title into a variable.
			// Default to the default title if it fails.

			try {

				title = rootWeb.get_title();

				title = title || defaultTitle;

			} catch (e) {

				title = defaultTitle;

			}

			// Update our title to our results.
			document.getElementById('webTitleContainer').innerHTML = title;

		}, function() {

			// If all else fails, set the title back to our default.
			document.getElementById('webTitleContainer').innerHTML = defaultTitle;

		});

	}

})();
That’s cool, wherever this code is run it will set an HTML element with an ID of ‘webTitleContainer’ to the root web’s title.
Putting it all together
So how do we combine these two together?
Again this is pretty simple, take a look at the following PowerShell:
Add-PSSnapIn Microsoft.SharePoint.PowerShell

$containerCode = @"
<div id='webTitleContainer' class='ms-core-brandingText'></div>
<script type='text/javascript'>
(function() {

	// Set a default title to use if we cannot retrieve one.
	var defaultTitle = 'SharePoint';

	// Ensure that both the DOM and the Object Model are ready for us
	document.addEventListener('DOMContentLoaded', function() {
		EnsureScriptFunc('sp.js', 'SP.ClientContext', function() {

			// Instantiate our renamer.
			var t = new titleBarRenamer();

		});
	});


	function titleBarRenamer() {

		// Get and load a reference to the root web of the current site collection.
		var ctx = new SP.ClientContext.get_current();
		var site = ctx.get_site();
		var rootWeb = site.get_rootWeb();

		ctx.load(rootWeb);

		// Send our query off to SharePoint.
		ctx.executeQueryAsync(function() {

			var title = false;

			// Pull the title into a variable.
			// Default to the default title if it fails.

			try {

				title = rootWeb.get_title();

				title = title || defaultTitle;

			} catch (e) {

				title = defaultTitle;

			}

			// Update our title to our results.
			document.getElementById('webTitleContainer').innerHTML = title;

		}, function() {

			// If all else fails, set the title back to our default.
			document.getElementById('webTitleContainer').innerHTML = defaultTitle;

		});

	}

})();
</script>
"@

$webApp = Get-SPWebApplication -Identity "http://mywebapplicationurl"
$webApp.SuiteBarBrandingElementHtml = $containerCode
$webApp.Update()
As you can see, the bulk of this is our JavaScript code from above, with the addition of a div for our title to end up in and the required script tags for the code.
Once you have this, you can save it as a .ps1 file and execute it in PowerShell. You may need to set the execution policy to RemoteSigned before you are able to do this.
And there you go. You could do some fairly interesting things with this, particularly as it takes effect right across the entire web application. You also have to be aware that this is stored within the Configuration Database rather than the Content Database, so will not be migrated if you move content databases from one farm to another.
via Chris on SharePoint http://spchris.com/2013/04/mastering-the-sharepoint-2013-suite-bar/
|
SharePoint and Project Server Consultant
This article has been cross posted from spchris.com (original article) |

Rename a workflow in SPD2010
Consider the following situation, you have a column in a list or library with a name such as “Workflow” , someone come along and creates a workflow called “Workflow” and associates it with your list, in isolation that is no problem. However you do now have 2 columns in your list / library view called “workflow” one is your column and the other is the status of your workflow.

In your list description you still only have one column called “Workflow”

But your end users are saying that when they are creating views there are 2 columns called “Workflow” and don’t know which to choose.

The most simple thing to do would be rename the Workflow, the only effect this should have is to change the name of your status column (personally I have not seen other side effects of doing this)
So in SPD we change the Workflow name, hit Save then Publish and nothing happens !, so we do it again and nothing happens, no changes in SharePoint, so we change the Workflow name then hit Rename then hit Save & Publish and finally it works, how odd !


Syncfusion Metro Studio #ModernUI #SharePoint #SP2013 and other products I use day to day
Now I don’t often talk about the products that I use on a day to day basis. However, I got introduced to a free product yesterday that is going to make my life sooooo much easier when creating POC work around SharePoint as well various Slide Decks I may create in the future in PowerPoint.
Anyway, this isn’t a review or an endorsement really, but it has been out for a while now (looks like almost a year) and I totally missed it, so I figured others may have missed it also.
http://www.syncfusion.com/downloads/metrostudio
 Special thanks to Oliver Stickley (CPS) for finding this gem of a tool 🙂 – It has already been used for one of our projects and POC’s
You can find out more about Oliver here: http://uk.linkedin.com/in/olistickley
Other products I use on a daily basis:
Apart from the usual SharePoint Designer, Microsoft Office and Project and Visio tools, here are some other tools that I use on a regular basis.
Nattyware – Pixie

Useful for getting the colour palette directly from a web page / application. So useful, I have this on my taskbar all the time for quick and easy access.
http://www.nattyware.com/pixie.php
U2U CAML Builder
Useful in 2007, 2010 and 2013. In a 2010 / 2013 world, I use this to create my CAML for my JavaScript CSOM work. In 2007, I use this to aid my jQuery SOAP request calls.
Expression Encoder 4 including Screen Recorder
 This is the main tool I use for recording my screen. It records the mouse pointer (as well as highlighting the pointer in a cool orange glow), can use the web cam and microphone as well as partial screen to full screen capture.
This is no where near as good Camtasia, but it is also free and easily available too ![]()
- http://www.microsoft.com/en-gb/download/details.aspx?id=27870
- Video Codec for playback before conversion: http://www.microsoft.com/en-GB/download/details.aspx?id=10732
Windows Live Essentials 2012

I use these tools to edit the videos I create for my blog / CodePlex solutions as well as blogging itself.
- Windows Live Movie Maker (Editing Videos)
- Windows Live Writer (Blogging)
- URL: http://windows.microsoft.com/en-GB/windows-live/essentials-home
Quick image edits via the web:
Not a replacement for Photoshop or your preferred image editor, but when you’re stuck on client site, can’t install software and need to make a quick change… Pixlr to the rescue
Colour Gradient Generator
Again, another quickie although potentially out of fashion now-a-days in this bold colour Modern UI world
URL Encode / Decode
Whilst coding, I often have to URL encode or decode based on some kind of output.
I have used this site for years: http://meyerweb.com/eric/tools/dencoder/
As I gather more unusual tools I will blog again, but hopefully this post will be useful for people.
Till the next time, happy SharePoint-ing.

#ProjectServer 2013 ribbon in different browsers with different zoom levels #PS2013 #SP2013
|
I am a Project Server and SharePoint consultant but my main focus currently is around Project Server.
I have been working with Project Server for nearly five years since 2007 for a Microsoft Gold Certified Partner in the UK, I have also been awared with the Microsoft Community Contributor Award 2011. I am also a certified Prince2 Practitioner. This article has been cross posted from pwmather.wordpress.com (original article) |
A quick post just to highlight how different browsers will render the ribbon differently based on the zoom level of the session. Some examples below to show the differences between IE 9 and Chrome version 26. At the default 100% all browsers render the ribbon identically. All pages / ribbons are affected.
IE 9 – Tasks Page – 125% zoom:

Chrome – Tasks Page – 125% zoom:

Notice the buttons are all grouped together.
What is interesting is if you increase the zoom to 150% in Chrome the buttons are no longer grouped:

Just something to be aware of if you have a user who raises this. Ask them to press Ctrl and 0 to set the zoom to the default 100% and the buttons should appear as normal on the ribbons.

![]()

SharePoint Evolution Conference–things to remember / learn
So today was the last of the 3 day Evolution conference that has been running at the QEII centre in Westminster. http://www.sharepointevolutionconference.com/
The whole conference has been fantastic with a very good selection of speakers
My highlights were Andrew Connell’s (http://www.andrewconnell.com/blog) Talk on single page applications or SPA’s. I am sure this will appear on his blog soon
the other was Chris O’Brien’s (http://www.sharepointnutsandbolts.com) talk on SharePoint App’s and why they make a lot of sense. He did a mock conversation, which i have gone through myself, on how SharePoint hosted apps are not powerful enough and we want to use c# in a provider hosted app which then leads down the rabbit whole of either Azure costs or the maintenance and DR of our own server. This all leads back to the question “What was wrong with SharePoint hosted apps anyway?”
The big take away from the conference was that there is not that much you cannot do with SharePoint hosted app if you really think about it. So we need to get outside of our nice comfy C# sofa and start learning JavaScript.
By this I mean REALLY learn JavaScript and not the hacking about we have been doing for the last few years. This means that we need to treat JavaScript as a real language (I realise that it is) and write the code properly using proper patterns. So that when we look at it all in a weeks time or have to show it in a demo it will make sense and that other people can actually support the code.
This seems daunting given the limited tooling that exists for JavaScript, especially when we think how lucky we are with the debugging tools we get for .NET code.
Someone, I forget who, came up with a brilliant analogy for what JavaScript is and it was “JavaScript is assembly language for the web”
When you think about it this makes a lot of sense. In the end the C# code we write is assembly when it finally gets executed.
This means that to write good JavaScript we need to use extra tools and frameworks that other people have provided.
The obvious one is jQuery which i now think is synonymous with JavaScript. If you are not using jQuery in you JS then you are just making life difficult.
The other frameworks that we should look to use and the main reason for this post are the following:
- TypeScript (http://www.typescriptlang.org/)
- TypeScript is a typed superset of JavaScript that compiles (YAY) to plain JavaScript.
- This looks very easy to write, especially as a C# person
- I am not sure there is a reason why you wouldn’t use this for everything.
- Modernizr (http://modernizr.com/)
- Modernizr is a JavaScript library that detects HTML5 and CSS3 features in the user’s browser.
- Knockout (http://knockoutjs.com/)
- Implements a MVVM pattern
- Durandal (http://durandaljs.com/)
- a Single Page App framework
- Bootstrap (http://twitter.github.io/bootstrap/index.html)
- Makes pages look nice
- Font Awesome (http://fortawesome.github.io/Font-Awesome/)
- Made for Bootstrap and provides icons and animations all through CSS and JS
- This is very cool
- LinqJS (http://linqjs.codeplex.com)
- I have actually used this in an app I have been working on and it is very useful
- Toastr (https://github.com/CodeSeven/toastr#readme)
- SharePoint style non-blocking notifications
Using some or all of the above does make the learning a little more daunting but after seeing the results this is clearly the way to move forward. When you see how little code you actually have to write it is just amazing what can be done.
As well as the extra frameworks the other key JavaScript things to learn are namespaces and promises.
Something else to note. Make sure you have the latest version of the SharePoint development tools installed and make sure you have the “Web Essentials 2012” extension installed as well. This will make life easier.
Please do not ask me for any code samples or video’s of the event as I do not have any and if I did I wouldn’t be allowed anyway.

![]()
via Buzz Blog http://paulbuzzblog.wordpress.com/2013/04/18/sharepoint-evolution-conferencethings-to-remember-learn/
 Paul is a an expert SharePoint and Project Server developer and is responsible for designing and implementing custom solutions on client systems using the latest SharePoint and .NET technologies.
Paul has extensive experience with SharePoint systems across all sizes of implementation, ranging from small to large farms and has an excellent understanding of all the elements of SharePoint. This article has been cross posted from paulbuzzblog.wordpress.com (original article) |


You must be logged in to post a comment.