Archive
SQL Server Reporting Services Reports error when large numbers of parameters are selected
You may encounter an exception when running certain SQL Server Reporting Services (SSRS) reports.
The exception message will generally say something along the lines of Operation is not valid due to the current state of the object.
You may encounter this either in reports with a large number of parameters, or in reports where the parameter counts are low but the parameters themselves are multiple choice and have a large number of items selected.
The cause of this is a security fix released by Microsoft under Security Bulletin MS11-100. The fix, among other things, limits the number of keys that ASP.NET applications can parse as part of a request; large numbers of keys could potentially allow a denial of service to occur.
Unfortunately the effect of this is that our large parameter set is blocked, causing the exception and presenting a nasty error to our end users.
Luckily there is a solution to this.
The trick is to add a section to your web.config inside the <appSettings /> section.
<appSettings>
	...
	<add key="aspnet:MaxHttpCollectionKeys" value="5000" />
	...
</appSettings>
The actual value used should reflect the number of keys you believe will be used, but 5000 is a reasonable starting point.
If you are using SSRS in native mode, the web.config file is located within the reporting services installation path, usually C:\Program Files\Microsoft SQL Server\MSSQL\Reporting Services\ReportServer.
If you are using SSRS in SharePoint integration mode, the modification needs to be made to the web.config of the application pool where you are running your reports. For this I would recommend that you create a solution that utilises the SPWebConfigModification class as part of a feature receiver, rather than making the changes directly. This will ensure that the change is made across your SharePoint farm simultaneously without the human error that could come from doing the change manually on multiple servers.
Note: In both cases, these modifications either require a restart of the reporting server or in the case of SharePoint a recycle of the Application Pool. This will result in short outages so you will want to schedule this as part of maintenance accordingly.
For more information I would recommend reading the relevant KB article.
via Chris on SharePoint http://spchris.com/2013/05/sql-server-reporting-services-reports-errors-when-large-numbers-of-parameters-are-selected-2/
   SharePoint and Project Server Consultant
This article has been cross posted from spchris.com (original article) |

Managing path context in SharePoint
When working with SharePoint’s UI, it is often difficult to work out where in the URL structure you are.
You may for instance be working at the root of a site collection, but that itself may be several layers deep.
Take the following example.
You have a site collection for your company, but each team maintains its own site collection under the managed path (with wildcard inclusion) /teams.
Some of the team sites use a template that includes a master page that references an image gallery script. This gallery script has to load images out of a document library local to each team site.
The problem of course is determining the URL to the code and images, when they could be located at /teams/team-a/gallery images or /teams/team-b/gallery images
Of course in a server-side solution this is simple, SharePoint provides the handy shortcut of ~sitecollection. This works both directly in master pages:
<SharePoint:ScriptLink runat="server" Name="~sitecollection/Style Library/js/galleryscript.js" Language="javascript"/>
Or using a custom action within a SharePoint solution, sandboxed or otherwise:
<?xml version="1.0" encoding="utf-8"?>
<Elements xmlns="http://schemas.microsoft.com/sharepoint/">
	<CustomAction
		ScriptSrc="~sitecollection/Style Library/js/galleryscript.js"
		Location="ScriptLink"
	/>
</Elements>
But how do we achieve the same within the front end itself?
Introducing _spPageContextInfo
The _spPageContextInfo object is a really wonderful little thing. It is added by the SPWebPartManager control, which is included in all of the out of the box master pages (including default.master and system.master) and I really strongly recommend is added to any custom master pages you create.
Because of it’s essentially omnipresent nature it makes using _spPageContextInfo a really simple matter of, well, using it.
It is a small object, containing only a few properties of the page, the site and the site collection it is part of. Here is a JSON representation of what it contains.
{
	alertsEnabled: true,
	allowSilverlightPrompt: "True",
	currentLanguage: 1033,
	pageItemId: 1,
	pageListId: "{6300d68a-4512-49f0-85b9-d3671855e31c}",
	siteServerRelativeUrl: "/teams/team-a",
	userId: 1,
	webLanguage: 1033,
	webServerRelativeUrl: "/teams/team-a/subsite",
	webUIVersion: 4
}
Here’s a brief explanation of the properties in it.
alertsEnabled
This one is simple, is SharePoint’s alerts email notification service enabled for the current web application. This maps to the SPWebApplication.AlertsEnabled property.
allowSilverlightPrompt
Will the user be prompted to download Silverlight if they do not already have it when they attempt to use Silverlight based UI elements. This maps to the SPWebApplication.AllowSilverlightPrompt property.
currentLanguage
This is the current locale being used by the user, if they have not changed it to a custom one, then this maps to the SPWeb.Language property.
pageItemId
This is the ID of the current page’s item within the document library containing it.
pageListId
This is the GUID of the document library containing the current page.
siteServerRelativeUrl
This is the path of the site collection, relative to the web application.
userId
This is the user’s ID for the current site collection.
webLanguage
This is the default language for the current web. This maps to the SPWeb.Language property.
webServerRelativeUrl
This is the path of the web, relative to the web application.
webUIVersion
This is the UI version of the current web, determining if the master page and components in use and available is compatible with SharePoint 2007 (3), SharePoint 2010 (4) or SharePoint 2013 (5)
Note: The actual properties available varies depending upon where you happen to be. For instance the pageItemId and pageListId properties do not exist within system pages, as they do not have IDs and do not live within document libraries.
That’s pretty cool, but how do we use it?
Well, as they are properties we can pretty much use them however we wish. Let’s take a look at a simple way of referencing files in our gallery images document library, for example referencing a logo to use on the homepage.
(function() {

	// The path to the image.
	var imagePath = '/gallery%20images/logo.jpg';

	// The relative URL is usually without the trailing /
	// however if we are on the root site collection then it
	// is simply / on its own and must be handled.
	if (_spPageContextInfo.siteServerRelativeUrl == '/') {
		imagePath = imagePath.substring(1);
	}

	// Build our full image path.
	imagePath = _spPageContextInfo.siteServerRelativeUrl + imagePath;

	// Finally set our image's source to the images path
	$('img#logoImage').attr('src', imagePath);

})();
Of course this is a rather contrived example, and you should probably be using the client side object model (CSOM) to pull items from a document library. However I hope it demonstrates how the object can be used.
A common use I use this for is is actually with the CSOM.
var ctx = new SP.ClientContext(_spPageContextInfo.webServerRelativeUrl);
I do it this way because I have had issues with concurrency when using the get_Current() method in SP.ClientContext when there is other code in use on pages that I do not have control over.
via Chris on SharePoint http://spchris.com/2013/05/managing-path-context-in-sharepoint/
|
SharePoint and Project Server Consultant
This article has been cross posted from spchris.com (original article) |

#ProjectServer 2013 Administrator Manual #PS2013 #Project #SP2013

The guide also includes the SharePoint Central Administration PWA settings.
The guide can be downloaded from here.
Happy downloading.
via All about Enterprise Project Management (EPM) http://khurramjamshed.blogspot.com/2013/05/projectserver-2013-administrator-manual.html
 The author of the blog has an extensive experience of working as an EPM Consultant. Currently he is located in Dubai, UAE and working for Microsoft partner organization as Project Server specialist. He has a thorough experience of providing Project Management technical/functional consultancy to all sort of organizations. He is a certified PMP, a Project Server MCITP, and also received a MS community contributor award 2011.
This article has been cross posted from khurramjamshed.blogspot.com/ (original article) |

#SharePoint 2010 error setting PerformancePoint unattended account #SP2010 #PS2010 #HP
 I am a Project Server and SharePoint consultant but my main focus currently is around Project Server.
I have been working with Project Server for nearly five years since 2007 for a Microsoft Gold Certified Partner in the UK, I have also been awared with the Microsoft Community Contributor Award 2011. I am also a certified Prince2 Practitioner. This article has been cross posted from pwmather.wordpress.com (original article) |
A short blog post to highlight a workaround to a recent issue we experienced on a Project Server 2010 deployment. When trying to set the PerformancePoint unattended account we received an error:
The account credentials for the Unattended Service Account are not valid. Verify the domain user name and password are correct and that the account is located in a Trusted Domain
We experienced the same error via the UI in Central Admin and via PowerShell. The fix / workaround was quite simple in the end. This particular client had the HP ProtectTools enabled, this blocks any passwords being sent as plain text. We added an <SE>\ tag as shown below in the password string:
Set-SPPerformancePointSecureDataValues -ServiceApplication "PerformancePoint Service Application" -DataSourceUnattendedServiceAccount (New-Object System.Management.Automation.PSCredential "domain\user", (ConvertTo-SecureString "<SE>\password" -AsPlainText -Force))
With this tag in place the HP ProtectTools ignored that fact that the password was plain text and the unattended account was set successfully. This workaround only works when setting the unattended account using the example PowerShell script above. It doesn’t work in the UI.

![]()

#ProjectServer 2013 environment migration / rollover steps #PowerShell #PS2013 #MSProject #SP2013
|
I am a Project Server and SharePoint consultant but my main focus currently is around Project Server.
I have been working with Project Server for nearly five years since 2007 for a Microsoft Gold Certified Partner in the UK, I have also been awared with the Microsoft Community Contributor Award 2011. I am also a certified Prince2 Practitioner. This article has been cross posted from pwmather.wordpress.com (original article) |
This blog post will detail the PowerShell commands required to carry out an environment rollover / migration using Windows PowerShell where possible. The steps below use the 2 database approach to rollover over the Production environment to the Test / Development environment.
As a prerequisite I would recommend taking full backups of the Test / Dev farm to enable the environment to be rolled back if required. Use your usual farm backup procedures.
Test / Dev environment Prep
Firstly connect to the Test / Dev Application server and launch the SharePoint 2013 Management shell.
Type the following:
Dismount-SPProjectWebInstance -SiteCollection <URL of Test / Dev PWA site that you want to refresh with the Production data and config>
Example:

Press Enter and then type Y and press Enter to remove the PWA instance

You can check in Central admin in the Project Server Service Application to check that the PWA site has been removed:

Using the SharePoint 2013 Management Shell remove the existing content database from the web application that hosted the PWA site collection that was removed in the previous step.
Type the following:
Dismount-SPContentDatabase “<Database name here>”
Example:

Press Enter and type Y to confirm then press Enter

Test / Dev environment SQL Prep
Take a backup of the 2 databases from the Production environment and copy these over to the Test / Dev SQL server and restore the databases. The databases required are:
- Content database that contains the PWA site and Project Sites
- Project Web App database
Make a note of the database names used when these databases are restored as they will be required later.
Test / Dev environment configuration
Using the SharePoint Management Shell, attach the restored content database to the web application that will host the PWA site collection.
Type the following:
Mount-SPContentDatabase “<content database name restored in previous step>” -DatabaseServer “<Test / DEV SQL Server>” –WebApplication <web application URL>
Example:

Press Enter:

Using the SharePoint 2013 Management Shell mount the restored Project Web App database to the web application.
Type the following command:
Mount-SPProjectDatabase -Name “Name of the restored Project Web App database to mount” –WebApplication “Web Application ULR that the Project Web App database will mount to” –DatabaseServer “Test / Dev SQL Server where the database was restored”
Example:

Press Enter:

Now using the SharePoint 2013 Management Shell provision the PWA site collection in the web application where the database was just attached to and using the Project Web App database that was restored previously. Please note, use the same PWA path name used in Production. For example if the instance is called /PWA in Production, use /PWA in the command below on the Test / Dev environment.
Type the following command:
Mount-SPProjectWebInstance –DatabaseName “Name of the restored Project Web App database to mount” –SiteCollection “web application URL + PWA path” –DatabaseServer “Test / Dev SQL Server where the database was restored”
Example:

Press Enter:

You can check the provisioning status of the PWA site using PowerShell or in Central admin in the Project Server Service Application to check that the PWA site has been created:
Type the following:
Get-SPProjectWebInstance –URL <PWA URL> | Select ProvisioningStatus
Example:

Or in Central Admin:

Post Provisioning
The Project Sites will need to be relinked using the “Bulk Update Connected SharePoint Sites” functionality in Central Admin on the newly provisioned Test / Dev PWA site.
The Project Server Cube settings will need to be updated – update the SQL AS server / cube name.
Any Excel services reports will need to be updated to use the ODC files from the Test / Dev environment as they will currently point to the Production ODC files. This is done by opening the Excel reports in Excel, changing the ODC file then saving the file back to the library.

![]()

Update #SharePoint list item author and editor #SP2010 #PowerShell #PS2010 #SSRS
|
I am a Project Server and SharePoint consultant but my main focus currently is around Project Server.
I have been working with Project Server for nearly five years since 2007 for a Microsoft Gold Certified Partner in the UK, I have also been awared with the Microsoft Community Contributor Award 2011. I am also a certified Prince2 Practitioner. This article has been cross posted from pwmather.wordpress.com (original article) |
Recently while working on a client deployment we had an issue relinking the SSRS reports to the data sources within the same library – SSRS was in SharePoint integrated mode. We had developed the Project Server solution internally and migrated it to the clients environment at a later date. All worked as expected apart from trying to relink the SSRS Reports to the updated data sources. The SSRS data sources had been edited to use the correct databases / PSI web services but when we tried to link the reports to the databases from the Manage Data Sources menu, SharePoint threw an error when trying to browse to the data sources. The error from the ULS log can be seen below:
Microsoft.ReportingServices.Diagnostics.Utilities.SharePointException: , Microsoft.ReportingServices.Diagnostics.Utilities.SharePointException: Report Server has encountered a SharePoint error. —> System.NullReferenceException: Object reference not set to an instance of an object.
at Microsoft.ReportingServices.SharePoint.Objects.RSSPImpUser.get_LoginName()
at Microsoft.ReportingServices.SharePoint.Utilities.CatalogItemUtilities.GetListItemUserLoginName(RSSPListItem item, String fieldName)
The cause of this error was that the user who created the SSRS objects had been removed from SharePoint when the system was cleaned up to take on to the clients environment.
There is a simple fix, that is to update the Author (Created By) and Editor (Modified By) fields with a user that exists on the SharePoint farm. The Author field can’t be updated via the UI but it can be update via the object model.
I created a simple PowerShell script that will update the author and editor for all SharePoint list items in the chosen list. To download the PowerShell script please see the link below:
http://gallery.technet.microsoft.com/scriptcenter/Update-SharePoint-list-4e6272ab
There are some variables / settings that need to be updated before running the script, these can be found below:
$newuser = "support\paulmather" This needs to be updated with the new author and editor’s user account.
$site = get-SPWeb http://vm353/pwa/ProjectBICenter This needs to be updated with the correct URL for the site that contains the list / library.
$list = $site.Lists["Test"] This needs to be updated with the name of the correct library / lists that contains the list items that need to be updated, in this example the SSRS items.
That is it, the script is then ready to run.
Please fully test on a replica test farm before running on Production.

![]()

#ProjectServer 2013 PWA more integrated with Project Sites #PS2013 #SP2013
Since long i have been vocal about the distant connection between Project sites and PWA, formerly known as Project Work spaces in PS2007. Although project sites are meant to be a second home, other then PWA, to project team for their project activities.
However this distance some how comes in a way while convincing users to use project site associated with project to manage artifacts such as documents, issues and etc. One of the common request received in this case was, how to show projects tasks or project status on project site? and since there is no OOB way of achieving this in PS2010, then you have to come up with all these brilliant ideas of developing different custom solutions to accommodate such requests.
But it comes as a pleasant surprise in PS2013 that Project Sites are now more seamlessly connected with PWA. Though still the distant feeling exist, but was overcome to some extent to give user a more connected feel of Project site with their projects.
Your first experience: Project site link do not exist on ribbon anymore, its from with the Project now.
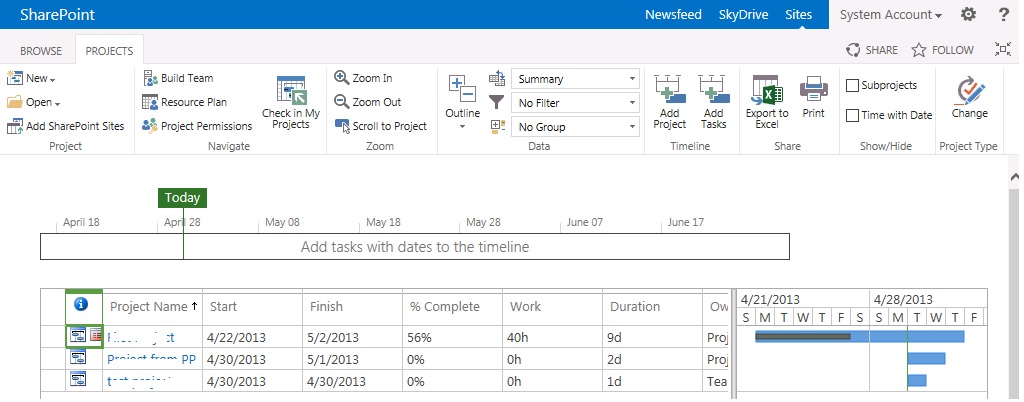
click on Project Name, and you will see the Project Site link along with PDPs.
click on Project Site link, and it will NOT open in separate window as new site like old times: (unless you prefer, and use any of the trick to open in new window 🙂 )
(some whistles.. please 🙂 )
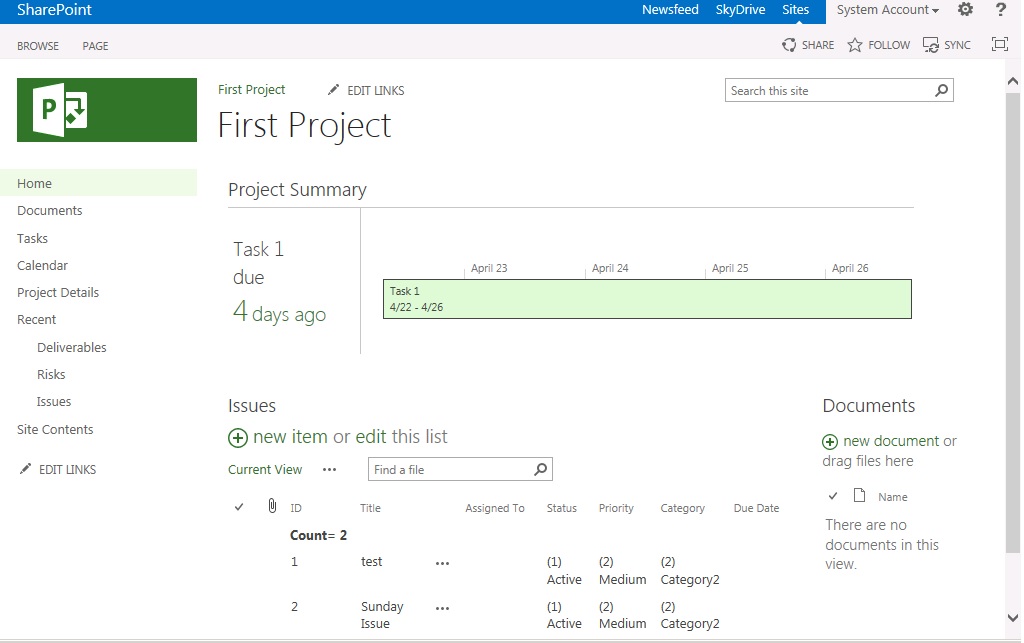
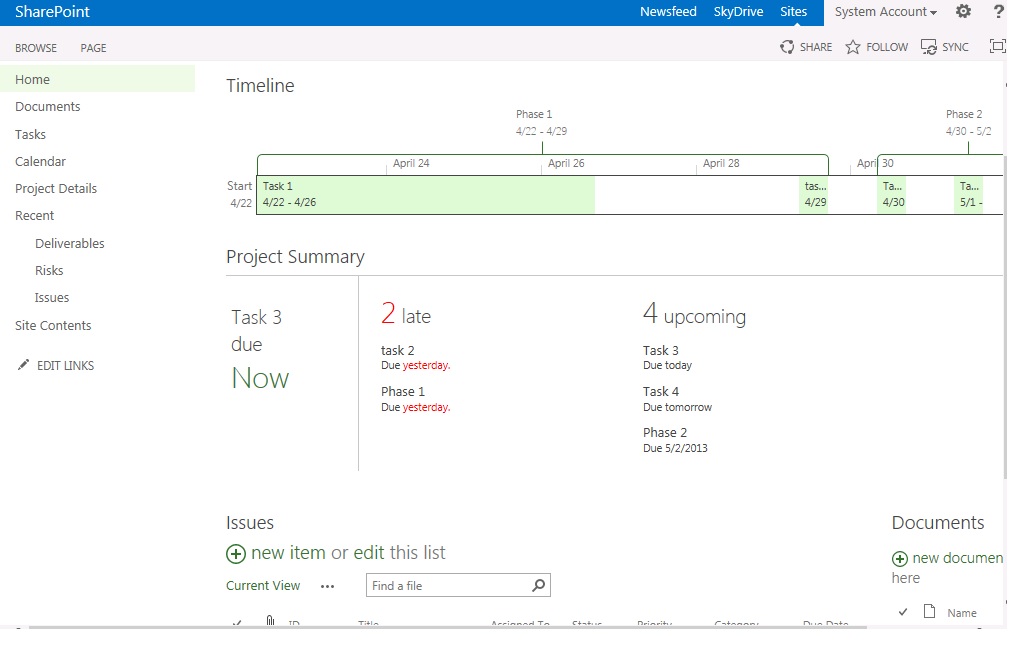
my first impression was WOW, the home page by-default shows the status including Project Timeline and Alert alert that you are behind schedule.
Deliverable/Issues and Risks lists are the same, in fact Paul Mather few days back wrote about the change of functionality of linking tasks along with issues/risks and documents here and took the opportunity away from me since i was also planning to write the same 🙂
(ok, ready for more good things …. :), here you go )
Tasks link until PS2010 was of no good in most cases, in fact i used to rename it as “Team Tasks OR Personal Tasks” for customers to avoid the confusion of mixing these tasks as project schedule tasks.
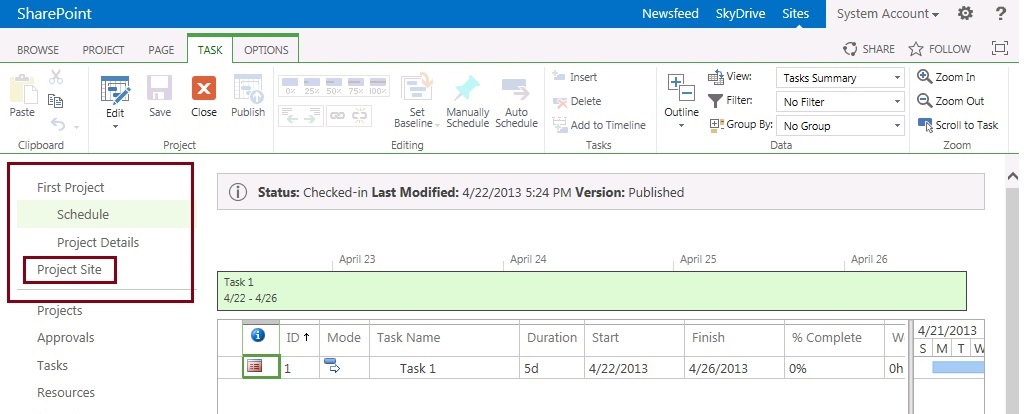
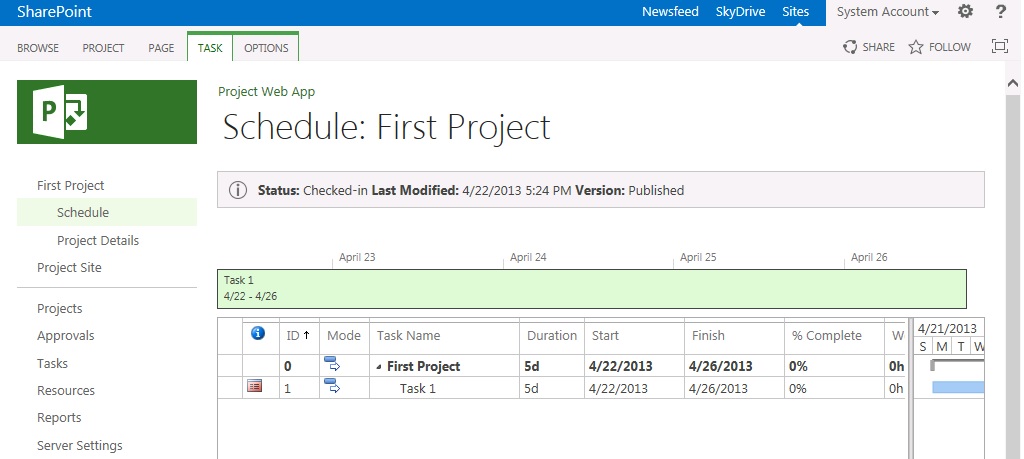
But now these alternates are not required any more. Lets click on Tasks link:
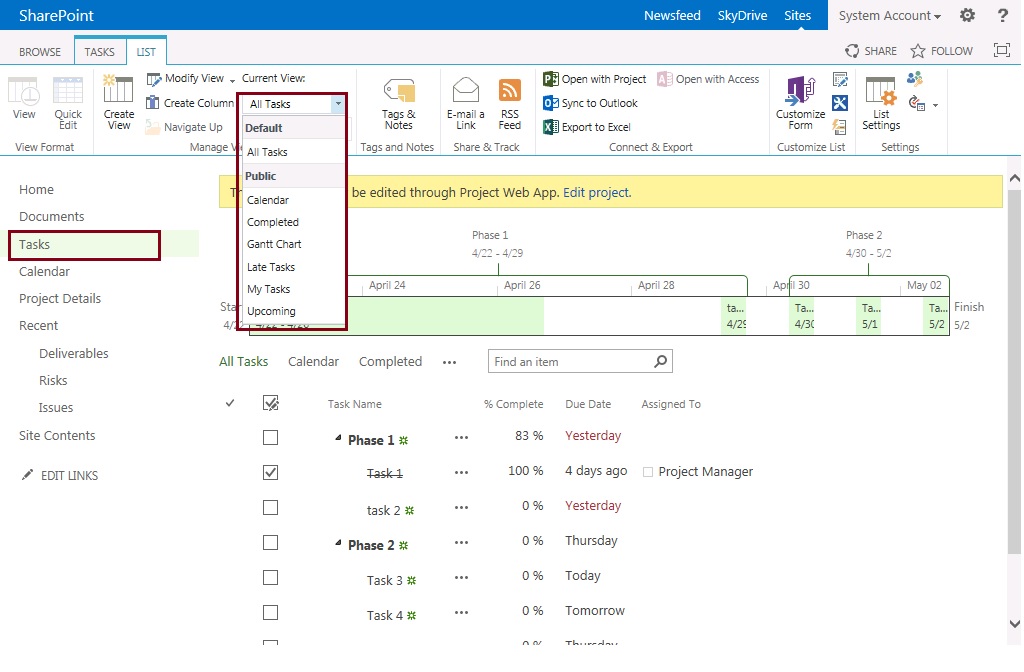
Your project tasks are displayed here to be shared with team, and of course you can change the view of tasks page to show you only Yours Tasks or etc. However you cannot edit the values of tasks here, such as %complete, it will take you back to project schedule for the editing which i believe is pretty logical.
Before we wind up, a quick hint to show that you can also add a famous Timeline web-part to your project site home page to show timeline alone. And also you can modify the existing Project Summary web-part to reflect information minus timeline.
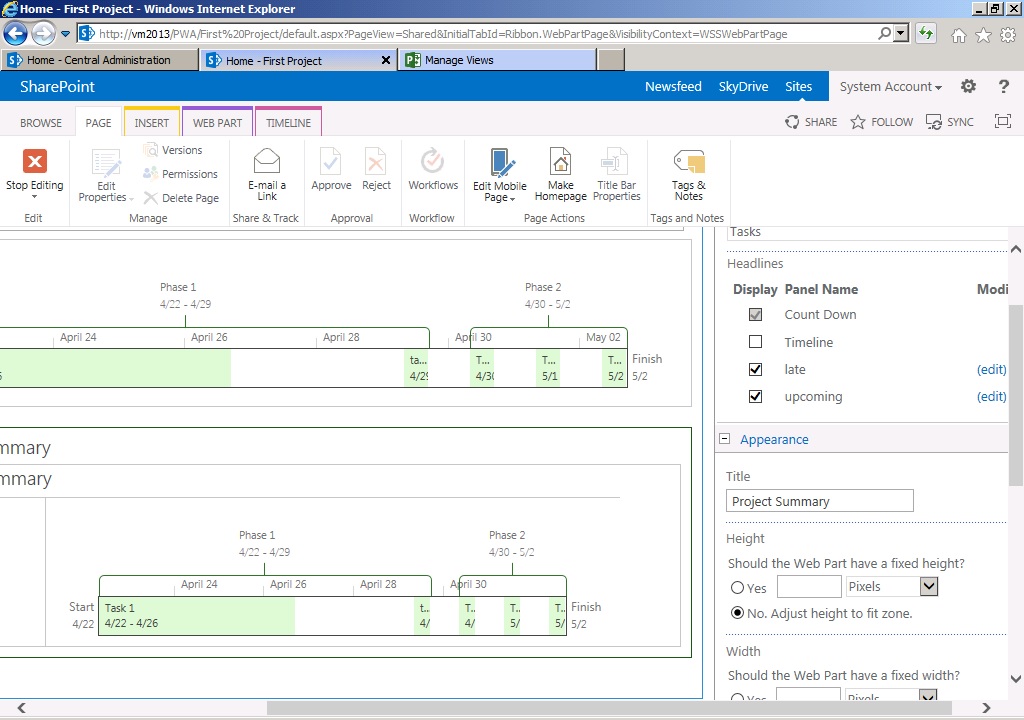
Here you go:
And now last but not the least, in order to go back to PWA, no need to look for navigation link on project site. Simply click on Project Details link to access project details:
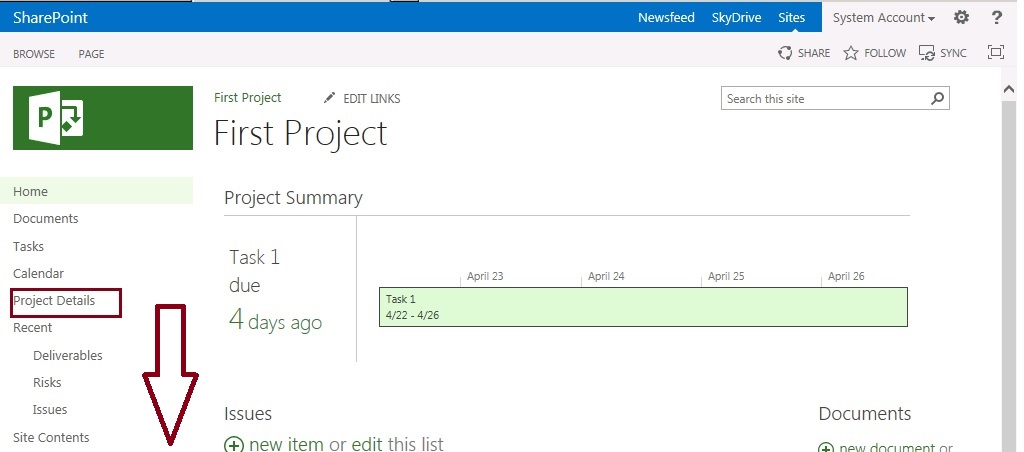 |
| Fig-1 |
This is it for now, we have seen enough good things – now lets get back to the real work issues 🙂
via All about Enterprise Project Management (EPM) http://khurramjamshed.blogspot.com/2013/05/projectserver-2013-pwa-more-integrated.html
|
The author of the blog has an extensive experience of working as an EPM Consultant. Currently he is located in Dubai, UAE and working for Microsoft partner organization as Project Server specialist. He has a thorough experience of providing Project Management technical/functional consultancy to all sort of organizations. He is a certified PMP, a Project Server MCITP, and also received a MS community contributor award 2011.
This article has been cross posted from khurramjamshed.blogspot.com/ (original article) |

Dr Popup: Or How I learned to stop worrying and love the modal dialog
One of the many pieces of functionality added in SharePoint 2010 was the dialog window, this is a nice little control implemented in JavaScript that allows us to display a “lightbox” style dialog, containing either another page within our site or direct HTML.
This post will explain how to pass information back and forth between the page creating the dialog and the page displayed within that dialog.
Firstly lets take a look at the JavaScript on our calling page. This could be added through any of the normal methods of inserting JavaScript into a SharePoint page.
(function() {

	// Use jQuery to wait for the DOM to be ready
	$(document).ready(function(){

		// Use SharePoint's SOD (script on demand) to wait for SharePoint to be ready
		ExecuteOrDelayUntilScriptLoaded(function() {

			//Create an options object (valid options properties reference - http://msdn.microsoft.com/en-us/library/ff410058(v=office.14).aspx):
			var options = SP.UI.$create_DialogOptions();

			options.title = "My dialog";
			options.autoSize = true;
			options.url = "/pages/myPage.aspx";

			//arguments to pass in to dialog (standard anonymous object)

			options.args = {
				someKey: "Some Value",
				someOtherKey: "Some Other Value"
			}

			//callback to handle the result from the dialog, you process the result of your
			//dialog from the origin page.

			options.dialogReturnValueCallback = function(result, arguments) {
				if (result == SP.UI.DialogResult.OK) {

					// Our arguments parameter contains the arguments originally passed to the dialog, so we could
					// reference arguments.someOtherKey here for instance and it would contain the value "Some Other Value"

					SP.UI.Notify.addNotification("OK Button clicked");

				} else if (result == SP.UI.DialogResult.Cancel) {

					SP.UI.Notify.addNotification("Cancel button clicked");

				}
			}

			// Create the dialog with options.
			SP.UI.ModalDialog.showModalDialog(options);

		}, "SP.UI.Dialog.js");

	});

})();
As you can see, there are 3 major parts to this, the options object, the args object and the callback.
The options object is created using the SP.UI.$create_DialogOptions() factory, although I have seen people using an empty object without apparent issue.
Into this you set various options affecting the way the dialog is presented, such as title, size and the url to the page to be displayed. A list of available options is posted on MSDN.
The args object is actually a property of the options object, and can be any sort of JavaScript object, be it an anonymous object like in our example above, or a closure, or a data model or anything else you may wish to send. This object will be available within the page shown in your dialog.
The last part is the callback, this is also a property set against the options object, and is a callback method executed when the DialogClose() method is called from within the parent page.
It takes two parameters, the result which should be one of the members of the SP.UI.DialogResult enumeration and the arguments, which can be any kind of variable or object returned from the dialog page.
Additionally in here you can call SP.UI.ModalDialog.RefreshPage() – this method takes a single parameter and is designed to be called using the result value from your callback. This method ensures that the page refreshes if the result is equal to SP.UI.DialogResult.OK
With these three sections we can define how our dialog looks, what data it takes in, and what happens once it is closed and how to process the data that comes back from it.
Lastly the dialog itself is opened using the call to SP.UI.ModalDialog.showModalDialog()
Now lets take a look at the other side of the coin, here’s the JavaScript code to run within the dialog page.
(function() {

	// As on the parent page, wait for the DOM and SharePoint to be ready before doing anything.
	$(document).ready(function() {
		ExecuteOrDelayUntilScriptLoaded(function() {

			// retrieve a reference to the page that called us.

			var _parent = SP.UI.ModalDialog.get_childDialog();

			// If this is false, then chances are you have browsed to the page directly rather than
			// loaded it in a modal window.
			if (_parent) {

				// Pull through the arguments sent to the dialog.
				var args = _parent.get_args();

				// set a red alert status line with our argument.
				var status = SP.UI.Status.addStatus("someKey:", args.someKey);
				SP.UI.Status.setStatusPriColor(status, "red");

				// Add handlers for our ok and cancel buttons
				$("#okButton").click(function() {
					// This closes the modal dialog and runs the callback method defined on the parent page.
					SP.UI.ModalDialog.commonModalDialogClose(SP.UI.DialogResult.OK, args);
				});

				$("#cancelButton").click(function() {
					SP.UI.ModalDialog.commonModalDialogClose(SP.UI.DialogResult.Cancel, "cancel clicked");
				});

			}

		}, "SP.UI.Dialog.js");
	});
})();
This again is fairly simple, we first of all get a reference to the calling page in the variable _parent. Then if that has been successful we pull in the args object from our options variable above.
Once at this point the world is your oyster, you can use the arguments from the parent page however you wish to display the dialog or interact with your users.
To close the dialog you can use SP.UI.ModalDialog.commonModalDialogClose(). This again takes two parameters, the first should be a member of the SP.UI.DialogResult enumeration, the second can be any object to send back, these map to the variables sent to our callback function above.
Additionally in here I have made use of some of the other neat parts of the SP.UI namespace such as the status bar and notification system. These are beyond the scope of this post but they’re pretty awesome and you should go read about them.
So there we go, by now you should be able to add true SharePoint style dialogs to your pages with minimal effort.
via Chris on SharePoint http://spchris.com/2013/04/dr-popup-or-how-i-learned-to-stop-worrying-and-love-the-modal-dialog/
|
SharePoint and Project Server Consultant
This article has been cross posted from spchris.com (original article) |

Where is the Project Fields web part in #ProjectServer 2013? #PS2013 #SP2013
|
I am a Project Server and SharePoint consultant but my main focus currently is around Project Server.
I have been working with Project Server for nearly five years since 2007 for a Microsoft Gold Certified Partner in the UK, I have also been awared with the Microsoft Community Contributor Award 2011. I am also a certified Prince2 Practitioner. This article has been cross posted from pwmather.wordpress.com (original article) |
A quick post to highlight a minor change to the PWA web parts in 2013. I was in the process of creating a new PDP on a 2013 environment and I wanted to add certain custom fields. In 2010 the web part that enabled you to do this was the Project Fields web part:

In 2013 this web part doesn’t exist, well it does but it is no longer called Project Fields, it is now called Basic Info:

It provides exactly the same functionality as the Project Fields web part in 2010.
Hopefully that will save you hunting around for this web part ![]()

![]()

#ProjectServer 2013 linking list items to tasks and other list items #PS2013 #SP2013
|
I am a Project Server and SharePoint consultant but my main focus currently is around Project Server.
I have been working with Project Server for nearly five years since 2007 for a Microsoft Gold Certified Partner in the UK, I have also been awared with the Microsoft Community Contributor Award 2011. I am also a certified Prince2 Practitioner. This article has been cross posted from pwmather.wordpress.com (original article) |
The linking functionality has changed in Project Server 2013, in Project Server 2010 you used to create the links on the Custom Commands tab as shown below:

In 2013 this feature has been updated and no longer exists on the new or edit forms. This blog post covers how you can links items in 2013 using the web interface.
Firstly we will look at how you do this from one of the lists, in this example we will use the Issues list. As you can see in the image below, I have 2 issues:

To link Issue 1 to a task in the project, click Issue 1 and you will see the following page:

Click Add Related Item:

Double click Tasks:

Select the task required and click Insert:

Issue 1 will now show task T1 as the related item:

Clicking T1 will load the display form for T1 and show Issue 1 as the related item:

The project schedule in PWA will show the Issue icon that links to the Issue (same as 2010):

It is the same process described above to link Issues to Risks or Risks to Issues etc.
The second method to link tasks to issues is from the Tasks list on the project site:

Click one of the tasks:

Click Show More:

Click Add Related Item and follow the same steps above to select the related item.
The third method is from the schedule page in PWA. Select the task from the grid and click the Options tab:

Click the Related Items button on the ribbon and that task will open from the task list on the project site:

Notice this time the Related Items is displaying by default. This is due to &ShowRelatedItems=1 being appended to the URL. Now follow the same steps detailed above to select the related item.
Slightly more steps to link items but very simple.

![]()


You must be logged in to post a comment.