#Office365 #ProjectOnline Project Request process using #MicrosoftForms and #MicrosoftFlow #ProjectManagement #PPM #MSProject #SharePoint #PowerPlatform
|
I am a Project Server and SharePoint consultant but my main focus currently is around Project Server.
I have been working with Project Server for nearly five years since 2007 for a Microsoft Gold Certified Partner in the UK, I have also been awared with the Microsoft Community Contributor Award 2011. I am also a certified Prince2 Practitioner. This article has been cross posted from pwmather.wordpress.com (original article) |
Following on from my last post where I created an example Microsoft Flow to create a project in Office 365 Project Online using the correct Enterprise Project Type, I’ve extended this to show how to build a project request process using Microsoft Forms, Flow Approvals, SharePoint and Project Online. If you missed the last post, here it is https://pwmather.wordpress.com/2019/09/27/creating-new-projects-based-on-epts-in-office365-projectonline-using-microsoftflow-ppm-powerplatform-rest-msproject-projectmanagement/
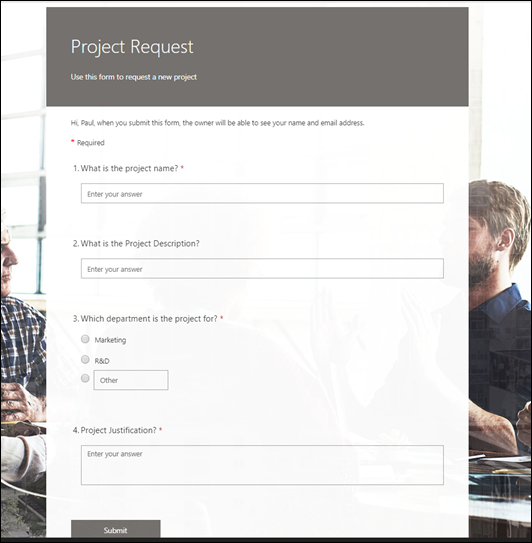
For this project request process there are a few components required, the Form and the SharePoint list then the Flow to bring it together. The form is used to capture the project requests but this could as easily have been a PowerApp. My simple form can be seen below:
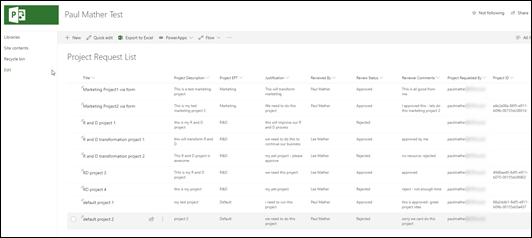
We could ask any questions we want on the form but the key part for this project request example is the department question as this is used for two purposes. The first, to get the project approvals from the correct person in that department and secondly to create the approved projects using the correct Enterprise Project Type (EPT) in Project Online. The next component is a SharePoint list to store the requests and approval responses. I created this in the Project Online Project Web App (PWA) site collection but again, this list could exist in any SharePoint Online site collection or we could have even created an entity in the Power Platform CDS to store the data. The simple list can be seen below:
The columns I have on this list are detailed below:
- Title – used to store the Project Name from the request form
- Project Description – used to store the Project Description from the request form
- Project EPT – used to store the project department from the request form
- Justification – used to store the project justification from the request form
- Reviewed By – used to store the Flow Approval reviewer
- Review Status – used to store Flow Approval status
- Reviewer Comments – used to store the Flow Approval reviewer comments
- Project Requested By – used to store the email address of the user who completed the request form
- Project ID – used to store the Project ID from Project Online for projects that get created by the Flow
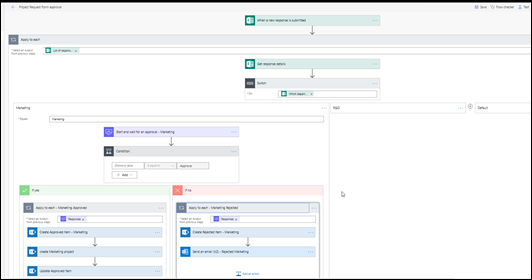
The next component is the Microsoft Flow, this is used to capture the Form responses once they are submitted, start the approvals, create the SharePoint list item on the Project Request List then if approved, create the project and update the list item. If rejected the Flow sends a rejected email to the project requester.The Flow can be seen below with one of the switch cases expanded:
I will cover the Flow in detail next but the final component required is Project Online. In my Project Online instance I have 3 EPTs, one for Marketing, one for R&D and the default Enterprise Project.
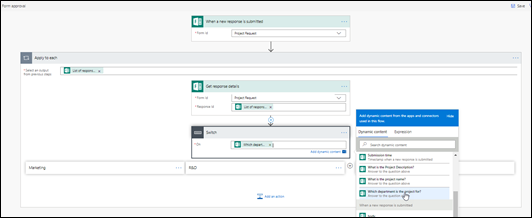
So back to the Flow, the Flow is triggered when a new form response is submitted to the Project Request form, it then uses an Apply to each loop with a list of the response notifications passed in from the trigger. The first step inside the Apply to each action is the Get response details Form action with the form response ID passed in. The Flow then uses a Switch action to have different paths based on the department value, the “Which department is the project for?” answer is used to switch on:
The Flow then has different cases in the Switch action, one for each of the possible values for the “Which department is the project for?” question:
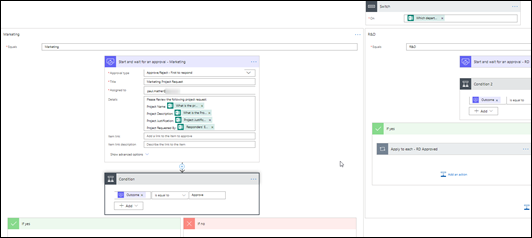
Now we will expand one of the cases to see the details and I will point out the differences between each case:
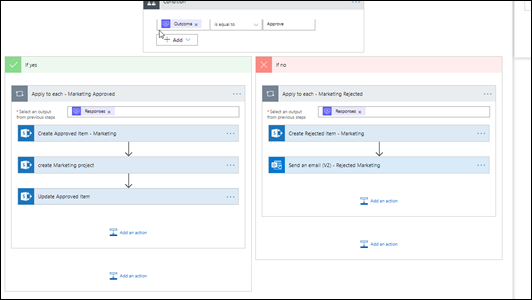
The first action in the case is a Flow Approval using the “Start and wait for an approval” action. This approval type is set to “Approve/Reject – First to response”. As this is the Marketing case, the approval title is “Marketing Project Request” and it is assigned to the user who approves new Marketing projects. I have just used my account for demo purposes! The title and approver it is assigned to could be different per department. Then in the details section we just pass in values from the “Get response details” action so that the approver knows what they are approving. Then there is a Condition action to check the outcome of the approval action, this just uses the Outcome output from the approval action. Then for approvals that were approved the Flow uses another Apply to each loop this time passing in the Approval action responses – we only have one approver but the Approvals action can have more than one response so it needs the loop. Then inside the approved loop the Flow uses the SharePoint create item action to create the list item on the Project Request List, then it uses the SharePoint HTTP action to create the project in Project Online then finally a SharePoint Update item action to update the list item with the newly created project ID. The overview can be seen below with details for these actions next:
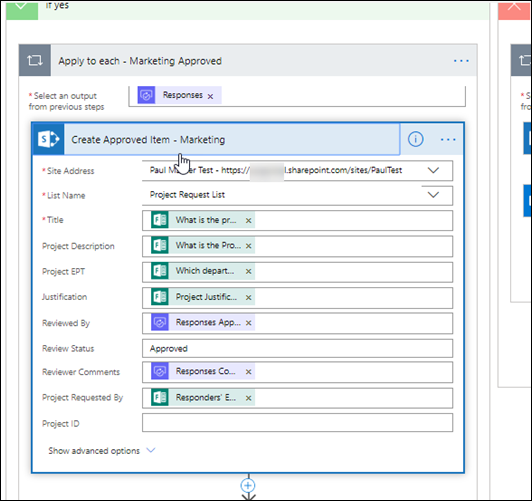
Create item action has the Form answers and the approval reviewer and reviewers comments passed in to create the list item:
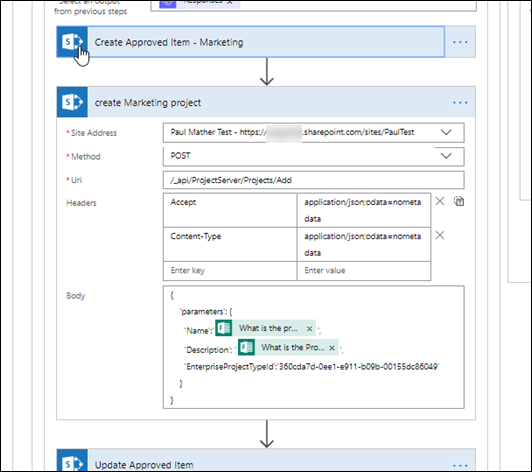
The SharePoint HTTP action posts to ProjectServer/Projects/Add API with the project name and description being passed in from the Form answers, the EnterpriseProjectTypeId is hard coded to the Marketing EPT – this GUID would be different in the other cases so the project is created with the correct EPT:
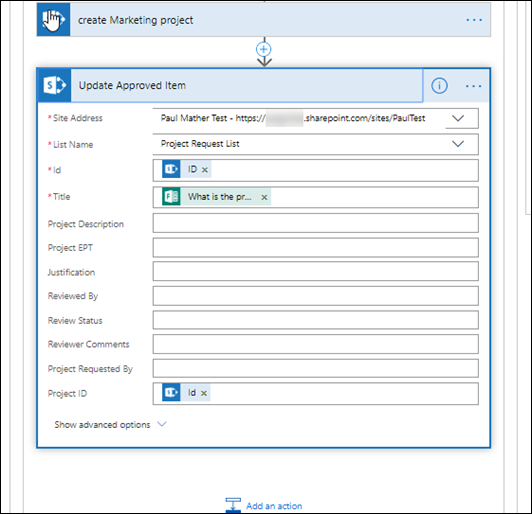
The final action for the approved request is to update the previously created list item on the project request list with the newly created project Id using the SharePoint Update item action. Here we pass in the ID from the previous Create Approved item action, the Title is required so that is set again using the Form answer and the Project ID is set using an expression body(‘create_Marketing_project’)[‘Id’]. The expression will be different for the other cases as it needs the name of the action that is used to create the project.
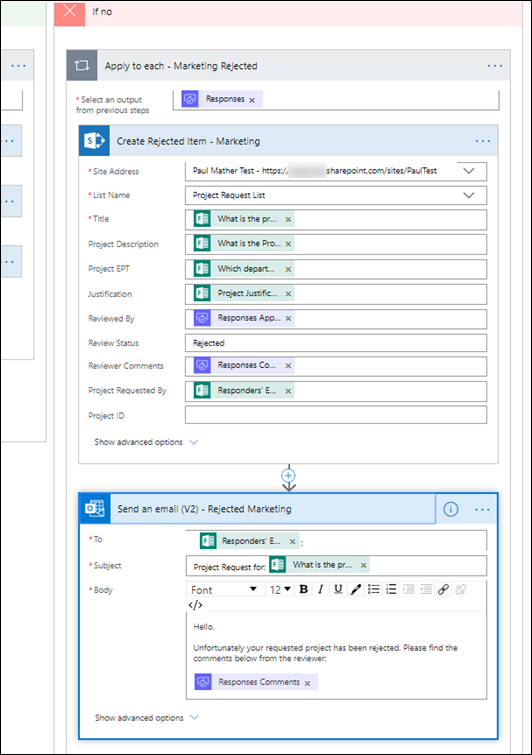
If the project request is rejected, the Flow creates the item on the list the same way is does if approved but the Review Status field is set to “Rejected” then the Flow sends an email to the user who requested the project:
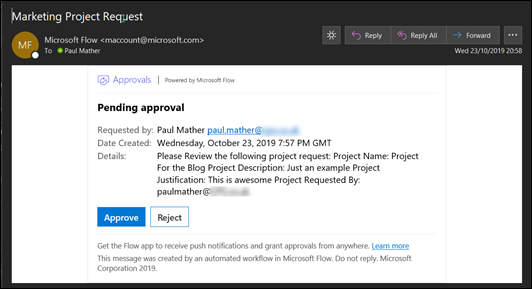
That’s it – really simple! Next I’ll show the approvals email for a requested project, this can be seen below:
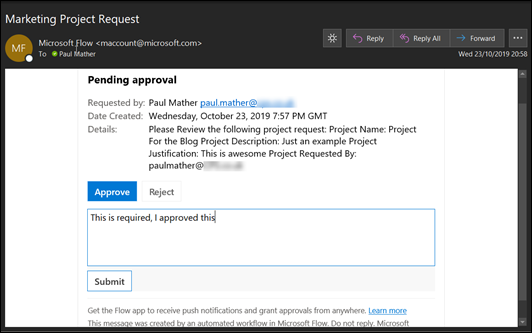
I will then approve this with some comments:
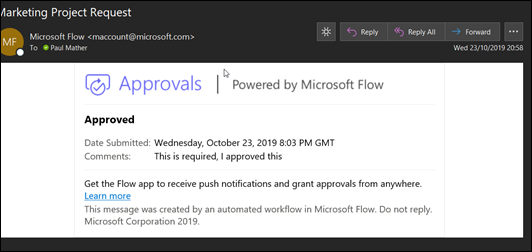
Once submitted, the email updates to show its approved:
In this example, the item is then created on the list, the project created and the list item updated with the project GUID. I will create a video in the next week or two to demo this.
A nice simple low / no code solution for building a project request process for Project Online using Microsoft Forms, SharePoint Online and Microsoft Flow, watch out for the video on my YouTube channel soon: https://www.youtube.com/channel/UC_b_pa1ADKlUqIpLK9AmR1g?sub_confirmation=1


