Archive
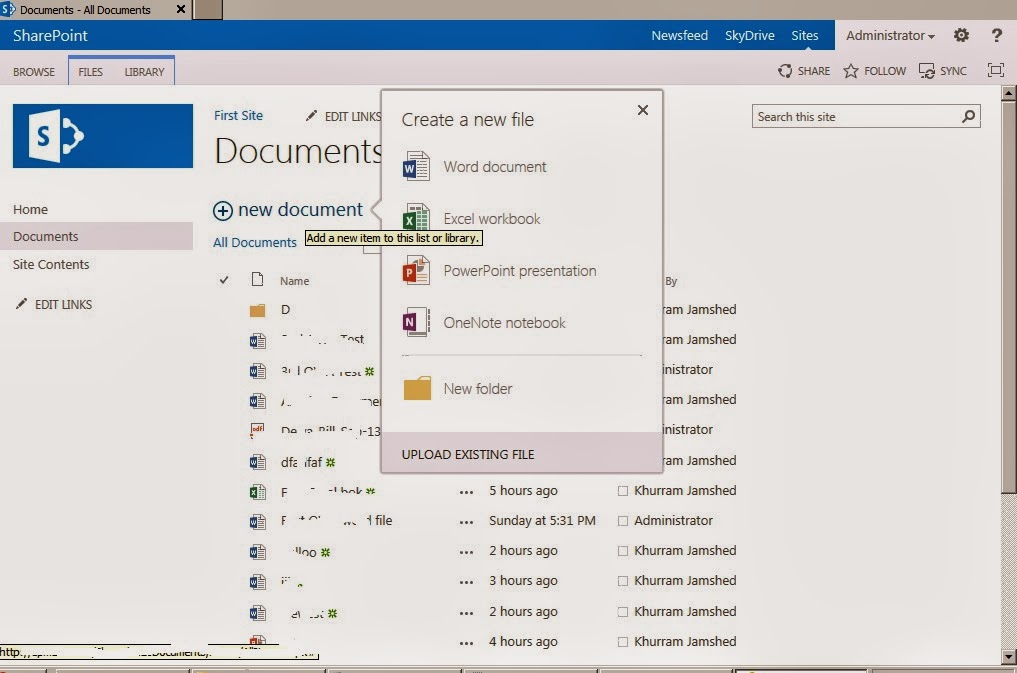
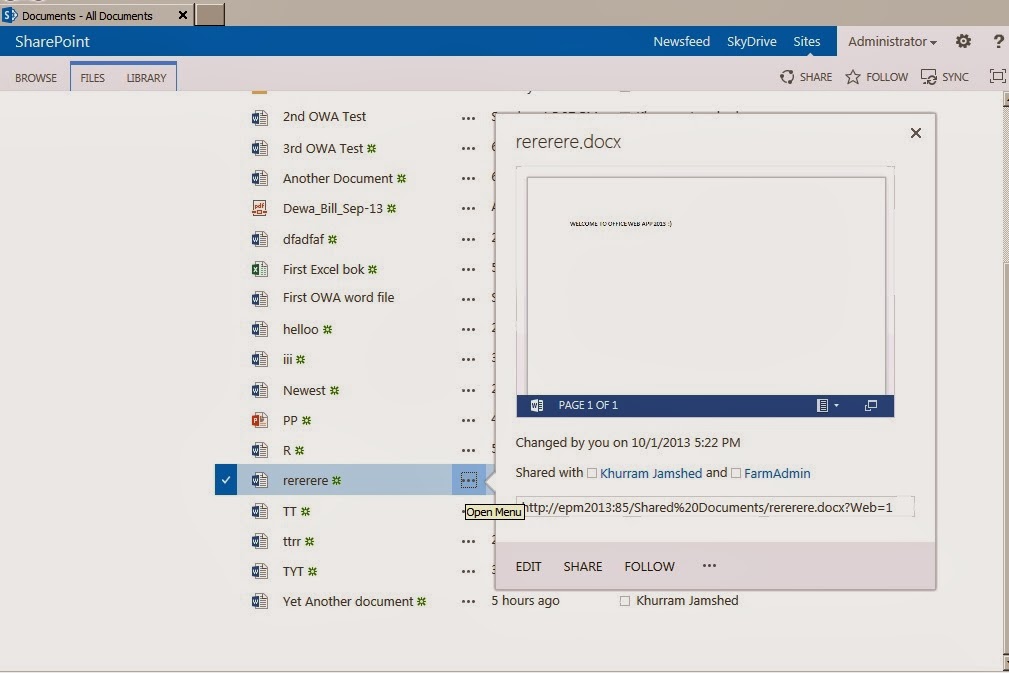
Office Web Apps Server 2013 – Unable to preview/create/edit through web #SP2013 #PS2013 #OWA2013
Follow these very detailed and helpful TechNet article in order to prepare Office Web App server , and then bind it with your SharePoint server later to make it work.
- Plan office Web Apps Server
- Deploy Office Web Apps Server
- Configure SharePoint 2013 to use Office Web App Server
via All about Enterprise Project Management (EPM) http://khurramjamshed.blogspot.com/2013/10/office-web-apps-server-2013-unable-to.html
   The author of the blog has an extensive experience of working as an EPM Consultant. Currently he is located in Dubai, UAE and working for Microsoft partner organization as Project Server specialist. He has a thorough experience of providing Project Management technical/functional consultancy to all sort of organizations. He is a certified PMP, a Project Server MCITP, and also received a MS community contributor award 2011.
This article has been cross posted from khurramjamshed.blogspot.com/ (original article) |

Better logging in SharePoint
Just a very quick post so i can remember this post which describes 5 different approaches to custom logging within SharePoint.
http://spdevlab.com/2013/06/21/5-suggestions-to-implement-a-better-logging-in-sharepoint/

![]()
via Buzz Blog http://paulbuzzblog.wordpress.com/2013/10/01/better-logging-in-sharepoint/
 Paul is a an expert SharePoint and Project Server developer and is responsible for designing and implementing custom solutions on client systems using the latest SharePoint and .NET technologies.
Paul has extensive experience with SharePoint systems across all sizes of implementation, ranging from small to large farms and has an excellent understanding of all the elements of SharePoint. This article has been cross posted from paulbuzzblog.wordpress.com (original article) |

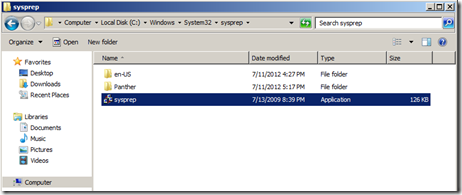
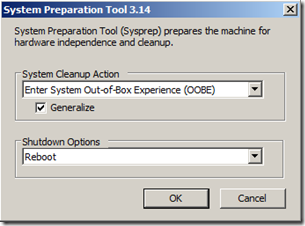
Virtual Machine – Duplicate SID issue #VM #Clonning #SID #SP2013 #PS2013
No mapping between account name and security SIDs was done


via All about Enterprise Project Management (EPM) http://khurramjamshed.blogspot.com/2013/09/virtual-machine-duplicate-sid-issue-vm.html
|
The author of the blog has an extensive experience of working as an EPM Consultant. Currently he is located in Dubai, UAE and working for Microsoft partner organization as Project Server specialist. He has a thorough experience of providing Project Management technical/functional consultancy to all sort of organizations. He is a certified PMP, a Project Server MCITP, and also received a MS community contributor award 2011.
This article has been cross posted from khurramjamshed.blogspot.com/ (original article) |

Recursive rules in InfoPath–How to prevent
A while ago I had a scenario in an InfoPath form where the user could either enter an amount or a percentage value. This value would then get added to a total already in the form. The requirement is that the user enters either value and the form then calculates the other one.
So if I enter a number then the percentage gets calculated. If I entered the percentage then the number value gets calculated.
So I quickly setup some rules so that when the value changed the percentage or the whole numbers gets calculated and updates the relevant field. This creates a loop of continually updated fields.
I had hoped that some clever InfoPath “stuff” would just make this work and I wouldn’t have to worry about the issue. This didn’t work and caused the form to fail or the fields would not update correctly.
The solution to this problem is that you need a third field to control the updates. Mine is called “Calculating” and is a simple Boolean field.
Now in the rules for Field1 (number) and Field2 (percentage) the first thing to do is to check that calculating = 0 then set calculating = 1 and then set your field. At the end set Calculating back to 0.
This is just a very simple implementation of a lock but it stops the InfoPath rules going crazy.

Pictures explain everything

![]()
via Buzz Blog http://paulbuzzblog.wordpress.com/2013/09/24/recursive-rules-in-infopathhow-to-prevent/
|
Paul is a an expert SharePoint and Project Server developer and is responsible for designing and implementing custom solutions on client systems using the latest SharePoint and .NET technologies.
Paul has extensive experience with SharePoint systems across all sizes of implementation, ranging from small to large farms and has an excellent understanding of all the elements of SharePoint. This article has been cross posted from paulbuzzblog.wordpress.com (original article) |

Programmatically Disable Event Firing on List Item Update in SharePoint 2010
All credit to the original post here
The short version for my future reference is
Create a simple class
public classEventFiring : SPItemEventReceiver
    {
       public void DisableHandleEventFiring()
        {
           this.EventFiringEnabled =false;
        }

       public void EnableHandleEventFiring()
        {
           this.EventFiringEnabled =true;
        }
    }
Then use this to disable events
 using (SPWeb web = site.OpenWeb())
                {
                    SPList list = web.Lists.TryGetList("Custom");
                    SPListItem item = list.GetItemById(34);
                    item["Title"] ="Updated Successfully";
                    EventFiring eventFiring = newEventFiring();
                    eventFiring.DisableHandleEventFiring();
                    item.Update();
                    eventFiring.EnableHandleEventFiring();
                    Console.WriteLine("Updated Successfully");
                    Console.ReadLine();
                }
            }

![]()
via Buzz Blog http://paulbuzzblog.wordpress.com/2013/09/19/programmatically-disable-event-firing-on-list-item-update-in-sharepoint-2010/
|
Paul is a an expert SharePoint and Project Server developer and is responsible for designing and implementing custom solutions on client systems using the latest SharePoint and .NET technologies.
Paul has extensive experience with SharePoint systems across all sizes of implementation, ranging from small to large farms and has an excellent understanding of all the elements of SharePoint. This article has been cross posted from paulbuzzblog.wordpress.com (original article) |
#ProjectServer #ProjectOnline example report #PS2013 #SP2013 #Office365 #BI #Excel #PowerPivot
 I am a Project Server and SharePoint consultant but my main focus currently is around Project Server.
I have been working with Project Server for nearly five years since 2007 for a Microsoft Gold Certified Partner in the UK, I have also been awared with the Microsoft Community Contributor Award 2011. I am also a certified Prince2 Practitioner. This article has been cross posted from pwmather.wordpress.com (original article) |
Following on from a post I wrote last month where I detailed creating a highlight type report for Project Online using ODATA and Excel 2013 / Power View, below details another simple example for a project cost / work dashboard with cumulative totals. The highlight report post can be seen below:
Firstly add the required ODATA feeds into the Excel workbook as described in the previous post (link above), you can see my connections below:

The two Project feeds need to contain the correct fields – the fields you wants to see on the report. As a minimum the project baseline feed should contain ProjectId, Project Name, Project Baseline Finish Date, Project Baseline Cost, Project Baseline Work and the project feed ProjectId, Project Name, Project Finish Date, Project Cost, Project Work. The TimeSet feed should look like this:
ProjectData/TimeSet()?$filter=day(TimeByDay) eq 1 and TimeByDay gt datetime’2013-01-01T00:00:00′ and TimeByDay lt datetime’2018-01-01T00:00:00′&$select=TimeByDay
The date range can be changed to suit.
The next section uses PowerPivot to create the calculated field for the TimeSet feed join – this is required for the cumulative totals. Credit goes to Andrew Lavinsky for this method. Click the PowerPivot tab then Manage. On the Projects table, add a calculated field with the formula below and rename it to Total Date:
=[ProjectFinishDate]-Day([ProjectFinishDate])+1-TimeValue([ProjectFinishDate])

Do the same on the ProjectBaselines table but using the following formula:
=[ProjectBaselineFinishDate]-Day([ProjectBaselineFinishDate])+1-TimeValue([ProjectBaselineFinishDate])
Now Click the Design Tab > Manage Relationships and set up the following relationships:

Close PowerPivot and rename the first Excel sheet to Pivottables and add another sheet, call this Charts. On the Pivottables sheet insert 2 Pivot tables as shown below:
Cost:

Work:

Notice the cost, baseline cost, work and baseline work values have been added twice. Rename the duplicate values to Cumulative Work, Cost etc. as seen below:

Currently both values will show the same data as the running totals have not been set up, this is completed next using the Cumulative Cost as an example. Load the field settings and click the “Show Value As” tab:

Select “Running Total In” and choose the Total Date Field:

Click OK. Repeat this for the 3 other cumulative fields.

Now create charts from both Pivot Tables and copy the charts to the Charts sheet:

Due to the lack of data in my test instance, the charts don’t look that great but you get the idea!
With a bit of time and patience you can get the charts to look presentable (better than mine do anyway!):

As you can see above, I have also added a slicer to enable filtering, in this example we can filter by Programme.

![]()

Always open Visual Studio 2012 in admin mode
So i have just started again using windows server 2012 and Visual Studio 2012. I had forgotten that you always have to run as an admin or lots of things don’t work. After this i forgot this twice i figured there must be a better solution.
Google to the rescue and all credit to the answer from this stack overflow question. These steps work great.
In Windows 8, you have to right-click devenv.exe and select "Troubleshoot compatibility".
1. select "Troubleshoot program"
2. check "The program requires additional permissions"
3. click "Next", click "Test the program…"
4. wait for the program to launch
5. click "Next"
6. select "Yes, save these settings for this program"
7. click "Close"

![]()
via Buzz Blog http://paulbuzzblog.wordpress.com/2013/09/13/always-open-visual-studio-2012-in-admin-mode/
|
Paul is a an expert SharePoint and Project Server developer and is responsible for designing and implementing custom solutions on client systems using the latest SharePoint and .NET technologies.
Paul has extensive experience with SharePoint systems across all sizes of implementation, ranging from small to large farms and has an excellent understanding of all the elements of SharePoint. This article has been cross posted from paulbuzzblog.wordpress.com (original article) |
#ProjectServer #PS2013 / #SharePoint #SP2013 site template issue
|
I am a Project Server and SharePoint consultant but my main focus currently is around Project Server.
I have been working with Project Server for nearly five years since 2007 for a Microsoft Gold Certified Partner in the UK, I have also been awared with the Microsoft Community Contributor Award 2011. I am also a certified Prince2 Practitioner. This article has been cross posted from pwmather.wordpress.com (original article) |
When creating new site templates in SharePoint 2013, ensure you check the box to include content. If you don’t do this, any sites created from your new template will have the “Change the look” functionality missing, it will load a blank page as shown below:

To resolve this, include the content when saving the new site template. Ensure that there is no test data on the lists / libraries etc.
Include content enabled:

After creating a site from this new template, the “Change the look” functionality will work as expected:


![]()

Create a #ProjectServer #PS2010 #PS2013 project from a template and update the EPT #SP2013 #SP2010 #PowerShell
|
I am a Project Server and SharePoint consultant but my main focus currently is around Project Server.
I have been working with Project Server for nearly five years since 2007 for a Microsoft Gold Certified Partner in the UK, I have also been awared with the Microsoft Community Contributor Award 2011. I am also a certified Prince2 Practitioner. This article has been cross posted from pwmather.wordpress.com (original article) |
I have been meaning to publish this PowerShell script for a few months but finally got around to it today. The PowerShell script creates a project from a template then updates the Enterprise Project Type (EPT). I did write a post over a year ago on how to create a project using PowerShell but this didn’t update the EPT:
The issue is that even if your Project Plan Template is associated to an EPT in Project Server, the project created from the CreateProjectFromTemplate method is associated to the default EPT regardless. This script will prompt for the project name, the project plan template name and the EPT name. It will create the project then update the project to associate it to the desired EPT. The script can be downloaded from the script gallery below:
http://gallery.technet.microsoft.com/scriptcenter/Create-Server-2010-2013-19bd3cc7
Once downloaded, the script will need to be updated with the correct PWA URL, the lines that need updating are 9 and 23. These can bee seen below:
![]()
![]()
Update the http://vm753/pwa part of the URL for your PWA URL.
A walkthrough using the script is below.
Open Windows PowerShell and navigate to the PowerShell file, in this example it is on the desktop:

Press Enter and complete the details:

The new Project will be called “CPS Test Project by Paul Mather”, it will use the “PMTemp1” template and then associate the new project to the “PM TEST” EPT.

The project is created as you can see in the Project Center:

It is also associated to the specified EPT:

The default EPT on this PWA instance is “Enterprise Project”:

When using the CreateProjectFromTemplate method only, this new project would have been associated to the Enterprise Project EPT as this is the default EPT.
This is just an example of what can be done, many improvements could be made, certainly around error handling but it provides a working example for you to build on. ![]()

![]()

#PowerShell scripts for #ProjectServer #PS2013 #SP2013 #PPM
|
I am a Project Server and SharePoint consultant but my main focus currently is around Project Server.
I have been working with Project Server for nearly five years since 2007 for a Microsoft Gold Certified Partner in the UK, I have also been awared with the Microsoft Community Contributor Award 2011. I am also a certified Prince2 Practitioner. This article has been cross posted from pwmather.wordpress.com (original article) |
I haven’t posted for a while due to work commitments and just generally being too busy – I am hoping this will change after the summer!
Anyway, just a quick post today to let you know that I have tested some of the key PowerShell scripts I wrote for Project Server 2010 on Project Server 2013. These also work for Project Server 2013. I have since updated the script gallery and associated blogs posts for these scripts listed below:
Publish All Projects:
http://gallery.technet.microsoft.com/scriptcenter/Server-2010-Publish-all-45ba385b
Publish Specified Projects:
http://gallery.technet.microsoft.com/scriptcenter/Server-2010-Publish-537857d8
High-level Audit example:
http://gallery.technet.microsoft.com/scriptcenter/Server-2010-High-level-e9c6ad09
Updating Project Server Lookup Tables:
http://gallery.technet.microsoft.com/scriptcenter/Update-Server-Lookup-table-bb1ae14f
My other scripts are available for download here:
http://gallery.technet.microsoft.com/scriptcenter/site/search?f%5B0%5D.Type=User&f%5B0%5D.Value=PWMather
Look out for more scripts coming soon.
Enjoy ![]()

![]()


You must be logged in to post a comment.