A Developer’s First Estimate Using Microsoft Project
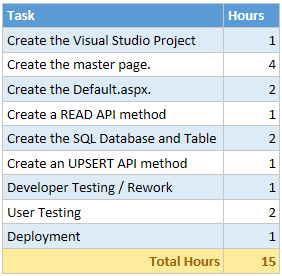
At some point you will be asked to create an estimate for a new project, feature or bug fix. I use Excel for creating simple project estimates. Excel serves well for this purpose. I already know how to use Excel, it’s simple, and virtually anyone can view the resultant *.xlsx file. My Excel estimates usually look something like this:
What’s not to like about this estimate? It’s nicely formatted. I highlighted the bottom line, which is the only line pointed-haired bosses likely look at. The truth is that this estimate is just fine for simple cases like minor bug fixes and one-off, small projects. As a front-line developer, all my estimates were created quickly in Excel just l like the example above.
Now that I am a technical lead, the projects I am asked to estimate are larger, more complex, and involve tasks that may themselves consist of sub tasks. When an estimate expands to anything more complicated than a simple single-level list of tasks and hours then you need to consider using a serious estimating and scheduling tool like Microsoft Project.
In this blog post I provide a couple of tips that I have found useful for jumping into Project and using it much like I used Excel for “simple” project estimation. Again, these steps work for me. I hope you find them useful too.
Open Microsoft Project and Start with a Blank Project
You don’t need a PMP or PRINCE2 certification to use Microsoft Project. Before we get started, take a deep breath and relax. It’s not as bad as you think!
I start with a new Blank Project template. Project ships with a Software Development Plan template which may be very useful, but that is beyond the scope of this discussion.
Add the Work (hours) Column
Our Excel estimate consisted of a Task column and a column I used to sum up work hours. We see a task column but the Blank Project template does not include a work column. In order to make Project resemble my Excel estimates I want to add the work column.
Right click on the Duration column and select Insert Column.
You can filter the extensive list of columns by typing “Work” in the column header.
Now your screen should begin to look familiar. You will have a Task and adjacent Work Column.
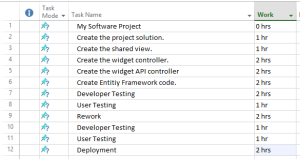
The next thing I like to do is name my project on the first line. This is critical to getting your work hours to roll up. On the first line click into the Task Name column and type the name of your project. In this example I used “My Software Project”. Don’t worry about providing a value for the hours column on this line. Project will do this for us.
Next begin adding the individual tasks that comprise the project along with an hours estimate of each task. Your estimate should resemble the image below.
Grouping Tasks
Now, let’s do something very cool! Let’s highlight each of the tasks below the first line “My Software Project”. Once these lines are highlighted click the indent button in the tool bar.
Now you can see that the sum of the hours for all tasks have rolled up into the top level “My Software Project” task. Pretty cool eh?
More Task Grouping
You can’t have too much of a good thing. Just as it is really helpful to see the total hours of our project we can take that a step farther by rolling our tasks into subdivisions.
Our estimate contains two distinct types of activities. Those where we are actually building the solution and those where we are testing and reworking our solution. Using the same steps we performed above we can further group related tasks by indenting. However, we first we need to add a couple rows to represent rollup lines. We are going to add Development and Testing tasks.
Tip: you can easily add tasks by clicking into the row where you want the new task added and pressing the insert key. The task will be inserted on the current line and existing tasks will be moved down to accommodate the new row.
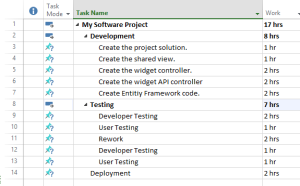
Next we are going to highlight the tasks that fall below Development and above Testing and click the indent button. Repeat these steps for the tasks that fall below Testing but before Deployment. Your estimate should look like this:
Notice how all the “development” tasks are rolled up to the development line and all the “testing” tasks are rolled up to the Testing line. Also note that the overall project My Software Project rolls up the total hours for the entire project!
Nesting your tasks allows you to easily analyze your estimate and know where the hours are going. In this case, we can see that roughly half of the project time is spent actually writing code whereas the other half is dedicated to testing an rework. I can almost smell the cardstock on my PMP certification!
Predecessors and Scheduling
We could just leave well enough alone. As it stands, we created a perfectly good, simple estimate using Microsoft Project. However, I feel that I would be remiss if I didn’t mention predecessors and scheduling.
You know as well as I do that once your boss drinks in the beauty that is your estimate the next words that are spoken will be “Looks great! When can we have this in production?” Let’s address that question.
To complete our simple estimate we are going to spend just a few moments on simple scheduling! This means filling the predecessors column for our tasks and setting the task mode.
Setting the Task Mode to Auto Schedule
Once you have a good understanding of the task details of a project, you can switch the task’s mode to Auto Schedule. To do this, click into the Task Mode column and select Auto Scheduled from the drop down list. Repeat this selection for every task in the project. Setting the task to auto schedule allows project to create a project schedule based on the amount of work, predecessor tasks, the number resources assigned to the task, and other factors such as weekends and work holidays.
Setting Task Processors
Setting a task’s predecessor helps Project create a schedule by defining which prerequisite tasks must be completed before a subsequent task can begin. For instance setting Task B’s predecessor to Task A constrains Task B’s start date to the completion (end) date of Task A. To do this we use the predecessor column in project.
Notice that the predecessor column in task four (4) is set to task three (3). This means that task four (4) cannot begin until task three (3) is complete. I filled in predecessor values for all the tasks in the project.
Tip: Don’t set the predecessor value for a column that used for rolling up sub-tasks. For instance I left the predecessor of the Development and Testing columns blank. Instead, set the predecessor of the first task in the group to the last task in the preceding group.
Assuming you have set all your predecessor tasks correctly and your tasks are set to auto schedule you should begin to see the Gantt Chart fill itself out with your estimated project schedule.
This is Just the Beginning
The purpose of this blog was just to get you started using Project for estimates. The goals is that you could hand the estimate over to a PM that would transform your estimate into a fully realized project plan.
There are many other concepts that apply to scheduling such as resources and concurrent tasks. Perhaps these are a topic for a subsequent post.
|
I am a senior software developer and development team lead in Houston Texas. I am passionate about the “art” of software development. I am particularly interested in software design patterns and the principles of SOLID object-oriented code. I am an evangelist for test driven development. I love to think and write about my day-to-day experiences in the trenches of enterprise IT. I relish the opportunity to share my experiences with others. From the wire to the presentation, I am holistic solutions guy. I have broad experience in client side technologies such as Javascript, Ajax, AngularJS, Knockout, and Bootstrap. I have extensive experience with MVC, MVVM, and ASP.NET Web Forms. I am strong in SQL Databases, performance tuning, and optimization. I also have a background in network engineering, wide-area and inter-networking. This article has been cross posted from jcclements.wordpress.com/ (original article) |


You must be logged in to post a comment.